Installing the Windows operating system on modern computers with the UEFI standard and GPT hard drive format has become the norm. However, the traditional installation method using a bootable USB drive is not always the best option. In cases requiring a high degree of customization, when installing on a computer without an optical drive, or when encountering difficulties with standard tools, WinNT Setup emerges as a powerful and flexible solution. This article provides a detailed, step-by-step guide to help you install Windows 10 or Windows 11 using WinNT Setup in UEFI/GPT mode, while also addressing common questions and offering effective troubleshooting tips.
Introduction to WinNT Setup and Why You Should Use It to Install Windows in UEFI/GPT Mode
WinNT Setup is an unofficial but extremely powerful Windows installation tool designed to help users deploy the operating system from ISO, WIM, or ESD files. Unlike traditional methods that require burning an ISO file to a USB drive or DVD, WinNT Setup allows you to install Windows directly from a WinPE (Windows Preinstallation Environment) or even from another hard drive partition. This offers several significant advantages:
- Highly flexible: You can install Windows without a physical optical drive or bootable USB drive, which is very useful for computers that don't have USB ports or optical drives.
- Advanced customization: WinNT Setup allows you to integrate necessary driver packages (such as Intel Rapid Storage Technology—IRST), apply patches, or make system tweaks right during the installation process, saving you time later on.
- Wide Support: This tool supports the installation of multiple versions of Windows, from Windows 8 onward, including Windows 10 and Windows 11, using both the UEFI/GPT and Legacy BIOS/MBR standards.
- Partition Management: When used in conjunction with partition management tools such as MiniTool Partition Wizard, you have full control over creating and formatting hard drive partitions as you see fit.
Although WinNT Setup is a third-party tool—not developed by Microsoft—it has earned the trust of the user community and is widely used due to its effectiveness and ability to resolve many complex installation issues. However, it is important to always download software from trusted sources to ensure its integrity and security.
Preparing to Install Windows Using WinNT Setup
Thorough preparation is key to ensuring a smooth installation process. Here are the things you need to understand and prepare:
1. Understanding UEFI, GPT, Legacy BIOS, and MBR
Before you begin, it’s important to distinguish between these standards to ensure you install them correctly and avoid unwanted errors. To gain a deeper understanding of the differences between these standards, you can refer to the detailed article on partitioning hard drives using MBR/GPT and installing Windows in Legacy BIOS and UEFI modes..
- UEFI (Unified Extensible Firmware Interface): A modern firmware interface that replaces the traditional BIOS. UEFI offers faster boot times, supports hard drives larger than 2 TB, and includes advanced security features such as Secure Boot.
- GPT (GUID Partition Table): A hard drive partitioning standard designed to work in conjunction with UEFI. GPT supports hard drives with capacities of up to 256 TB and allows for the creation of up to 128 primary partitions. It is the optimal choice for modern systems.
- Legacy BIOS (Basic Input/Output System): This is an older firmware interface that limits hard drive capacity to 2 TB and allows a maximum of 4 primary partitions.
- MBR (Master Boot Record): This is an older partitioning standard that is compatible with Legacy BIOS and has limitations regarding partition size and the number of partitions, as noted.
To install Windows in UEFI mode, your hard drive must be formatted using the GPT standard. If your hard drive is currently formatted using the MBR standard, you’ll need to convert it to GPT (note that this may result in data loss if not done carefully).
2. Download the official Windows ISO file
You should download the Windows 10 or Windows 11 ISO file from Microsoft's official website to ensure its integrity and that it has not been tampered with. This ISO file will contain the Windows installation files (typically install.wim or install.esd) that WinNT Setup will use.
3. Prepare the WinPE environment
WinPE is a minimal Windows environment that allows you to boot your computer and perform system management tasks before installing the official version of Windows. You can use pre-built WinPE packages such as NHV Boot, or create your own custom WinPE package.
- Important note regarding bitness: To install 64-bit Windows on a UEFI system, the WinPE environment you use to boot must also be the 64-bit version. 32-bit WinPE cannot boot on a 64-bit UEFI system (unless CSM/Legacy mode is enabled and the system supports it).
- About NHV Boot: NHV Boot is a popular WinPE toolkit that includes several useful programs, such as Partition Wizard and WinNT Setup. When using third-party WinPE tools, be sure to download them from a trusted source to avoid security risks.
4. Download the IRST driver for Intel Gen 11+ (if needed)
For computers using 11th Gen Intel CPUs (Tiger Lake) or later, Intel has introduced Volume Management Device (VMD) technology. VMD enables the management of NVMe storage devices directly from the CPU, improving performance and power management. However, for the Windows installer (especially when installing from WinPE) to recognize NVMe drives managed by VMD, you must load the Intel Rapid Storage Technology (IRST) driver. Without this driver, the Windows installer may not detect your drive.
- How to download the official driver: You should download the IRST driver directly from the official support website of your computer manufacturer (OEM) (e.g., Dell, HP, Lenovo) or from Intel’s support website. Always prioritize official sources to ensure compatibility and security.
- When it's needed: This driver is only required for Intel Gen 11+ systems with VMD enabled in the BIOS/UEFI settings. Computers with AMD CPUs or Intel Gen 10 or earlier CPUs typically do not require an additional IRST driver.
5. Back up important data
The process of partitioning and installing an operating system always carries the risk of data loss. Be sure to back up all your important files to an external drive or a cloud storage service before you begin.
6. Avoid installing Windows XP/7 with UEFI
Although WinNT Setup may support older versions of Windows, installing Windows XP or Windows 7 in UEFI mode on modern hardware is not recommended:
- Windows XP: Does not natively support UEFI. Installing XP on a UEFI/GPT system is extremely complex and often requires third-party bootloader solutions or switching to Legacy BIOS/MBR mode, which is not optimal.
- Windows 7: It supports 64-bit UEFI, but not as fully as Windows 8 and later. It does not support Secure Boot and may encounter significant driver and compatibility issues with newer hardware.
For the best experience and to take full advantage of UEFI's features, you should install Windows 8, Windows 10, or Windows 11.
Guide to Partitioning a GPT-Formatted Hard Drive with MiniTool Partition Wizard (in WinPE)
Once everything is ready, the next step is to partition the hard drive using the GPT standard and create the necessary partitions. We’ll use MiniTool Partition Wizard, a powerful partition management tool that’s typically included in WinPE packages.
1. Boot into the WinPE environment
Plug the WinPE USB drive into the computer and turn it on. Access the boot menu (usually by pressing F2, F10, F12, or Del, depending on the manufacturer) and select to boot from your WinPE USB drive. Make sure you select the UEFI boot option for the USB drive.
2. Open the MiniTool Partition Wizard tool
Once you've entered the WinPE environment, locate and open the MiniTool Partition Wizard software (usually found on the Desktop or in the WinPE Start menu).
3. Convert the hard drive to GPT format (if necessary)
If your hard drive is formatted as MBR, you need to convert it to GPT. Note: Converting from MBR to GPT may result in the loss of all data on the drive if you do not select the correct option or back up your data beforehand. Please proceed with caution when performing this step.
- In MiniTool Partition Wizard, select the drive where you want to install Windows (usually Disk 1 or Disk 0).
- Right-click the drive and select “Convert MBR Disk to GPT Disk.”.
- Click “Apply” to save the changes.
If the hard drive is already formatted as GPT, you can skip this step.
4. Delete and create the necessary partitions
Now, we will delete the old partitions (if any) and create new partitions using the UEFI/GPT standard. The essential basic partitions include:
- EFI System Partition (ESP): Contains UEFI boot files.
- Microsoft Reserved (MSR) Partition: A small partition required by Microsoft, which is usually created automatically during installation but can be created in advance.
- Windows Installation Partition (C:): The location where the Windows operating system will be installed.
Follow these steps:
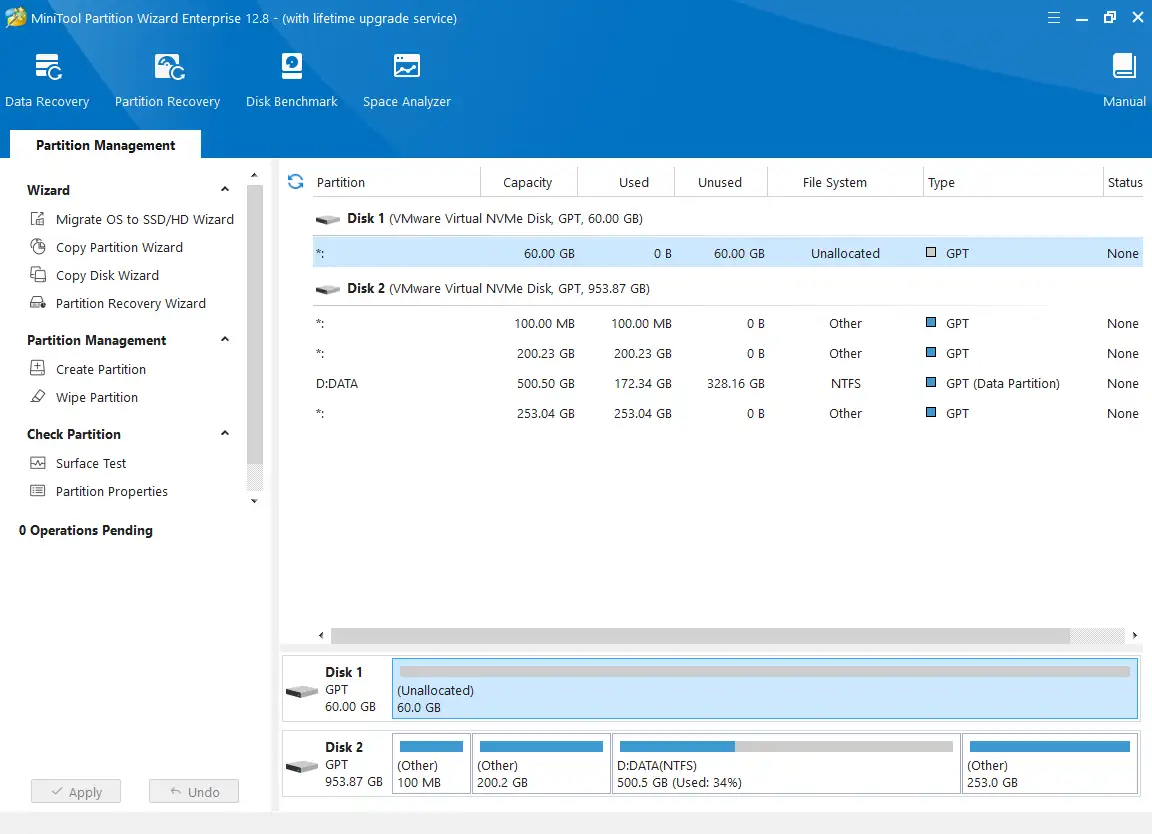
- Delete old partitions: Select the existing partitions on the destination drive (except for the ones you want to keep), right-click, and select “Delete.”.
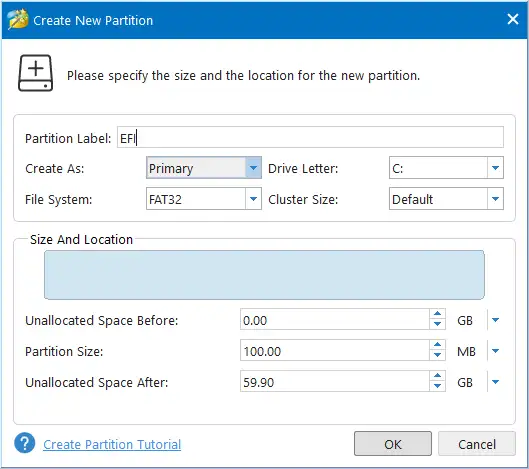
- Create an EFI (ESP) partition:
- Select the “Unallocated” region.
- Right-click and select “Create.”.
- Partition Label: EFI
- File System: FAT32
- Partition Size: Microsoft recommends a minimum of 100MB for Windows 10 and Windows 11 on Advanced Format drives. However, to ensure there is enough space for future updates or additional boot components, you may want to consider setting the size to 200MB or 300MB.
- After creating it, right-click the newly created EFI partition, select “Change Partition Type ID,” and select “EFI System Partition” (ESP).

- Create a Microsoft Reserved (MSR) partition: Typically 16 MB. You can create it manually or let the Windows installer create it automatically. If you want to create it manually:
- Select the remaining “Unallocated” partition.
- Right-click and select “Create.”.
- Partition Label: MSR (optional)
- File System: None (or leave blank)
- Partition Size: 16MB
- Right-click the MSR partition, select “Change Partition Type ID,” and select “Microsoft Reserved Partition.”.
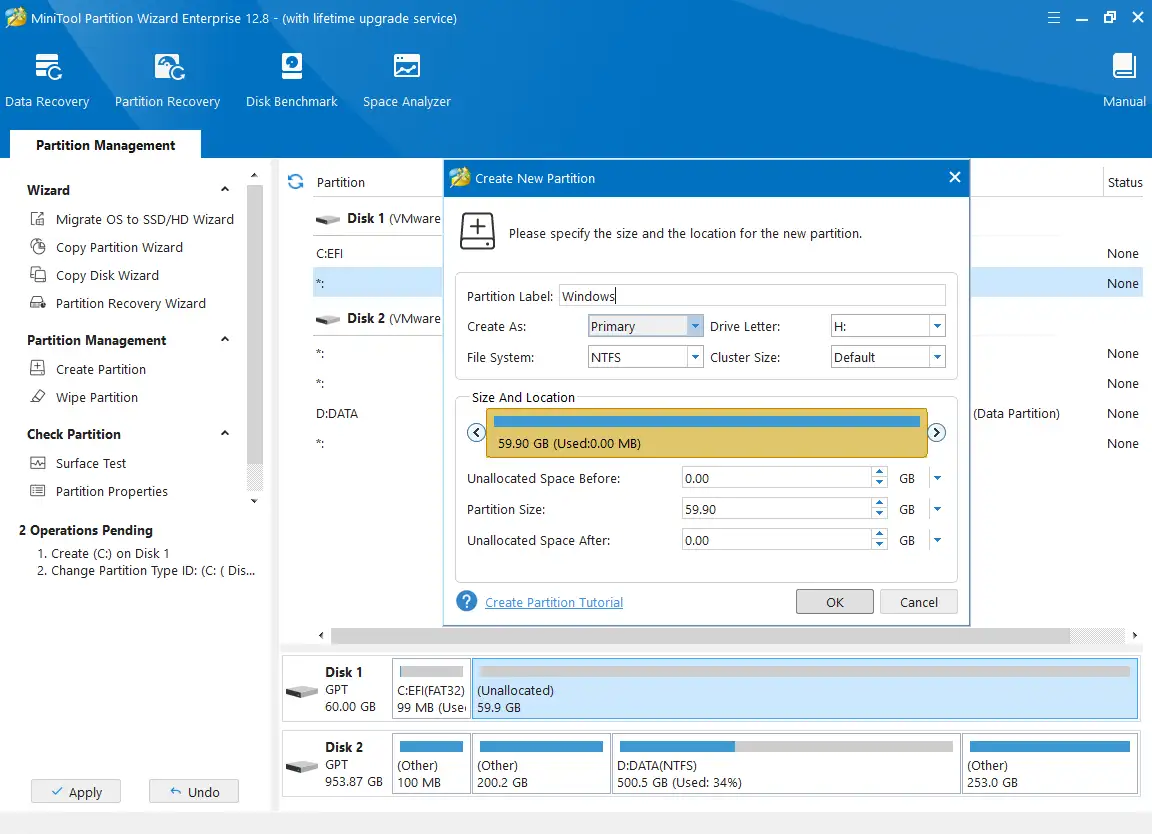
- Create the Windows installation partition (C:):
- Select the remaining “Unallocated” partition.
- Right-click and select “Create.”.
- Partition Label: Windows (or any name you choose)
- Drive Letter: C: (or another letter)
- File System: NTFS
- Partition Size: Set the size according to your needs (a minimum of 100 GB is recommended for Windows 10/11).
5. Apply the changes
After creating all the partitions, double-check to make sure everything is correct. Then, click the “Apply” button (usually in the upper-left corner) to have MiniTool Partition Wizard apply the changes. This process may take a few minutes.
Step-by-Step Guide to Installing Windows Using WinNT Setup
Once the partitions are ready, we will proceed to install Windows using WinNT Setup.
1. Open WinNT Setup in the WinPE environment
Locate and open the WinNT Setup software in your WinPE environment.
2. Configure the settings
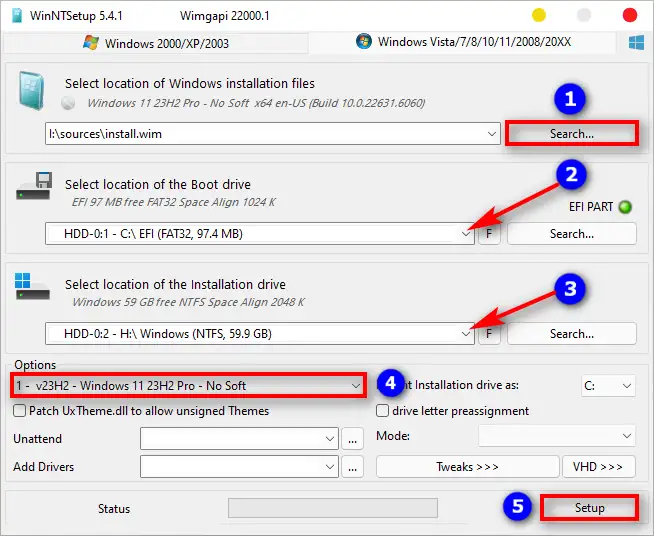
In the WinNT Setup interface, you'll see the main options that need to be configured:
- Select the location of the Windows installation files: Click the “Search…” button (usually a magnifying glass icon) and navigate to the folder containing the install.wim or install.esd file inside your Windows ISO. You can extract the ISO file to a folder on your hard drive or mount it as a virtual drive in WinPE.
- Select the location where Windows should be installed (Boot drive): Select the EFI partition (FAT32) that you created earlier. This is the partition that contains the UEFI boot files.
- Select the location where Windows should be installed (Installation drive): Select the Windows (NTFS) partition you created (usually the C: drive). This is where the operating system will be installed.
- Options: Select the version of Windows you want to install (for example, Windows 10 Pro, Windows 11 Home).
- Add Drivers (Integrate IRST driver): If you are installing Windows on a computer with an 11th Gen Intel CPU or later and have VMD technology enabled, you need to integrate the IRST driver.
- Click the “Add Drivers” or “Load Drivers” button.
- Navigate to the folder containing the IRST driver files you downloaded earlier.
- Select the appropriate .inf file and confirm.
- Configure other options: WinNT Setup may include additional options such as “Patch UEFI” (usually not necessary if you have created the EFI partition correctly) and “Disable Driver Signature Enforcement” (use only when you need to install unsigned drivers). For a standard installation, you can leave the settings at their defaults.
3. Start the installation process
After configuring all the options, click the “Setup” button to begin the installation process. WinNT Setup will display a confirmation dialog box; simply click “OK.”.
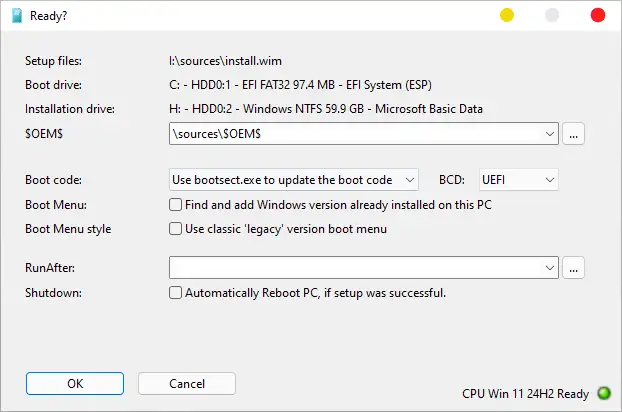
This process will copy the Windows files to the destination partition. The time required depends on your hard drive speed and computer configuration. When the copy process is complete, WinNT Setup will notify you. Click “Reboot” to restart your computer and continue with the Windows setup process.
Complete the setup and post-installation steps for Windows
After WinNT Setup is complete and the computer restarts, the system will continue with the initial Windows setup process, also known as OOBE (Out-of-Box Experience). These are important steps for completing the installation and ensuring the system runs smoothly.
1. The OOBE (Out-of-Box Experience) Process
You will be guided through a series of screens to configure the basic settings for Windows:
- Select your language, region, and keyboard layout.
- Internet connection: If possible, connect your computer to the Internet so that Windows can download the necessary updates and drivers.
- Set up a user account: You can choose to use a Microsoft account or create a local account.
- Privacy Settings: Configure options for diagnostic data, location, ads, etc.
2. Install the missing drivers
Although Windows can automatically detect some basic drivers, to ensure optimal performance and full functionality, you need to install any missing drivers, especially:
- Driver Chipset: Very important for system stability.
- Graphics Driver (GPU): For optimal display performance and support for graphics features.
- Audio Driver: For sound.
- Network Driver (Ethernet/Wi-Fi): If you don't have an internet connection yet.
You should download these drivers from the official support website of your computer manufacturer (OEM) or component manufacturer (e.g., Intel, NVIDIA, AMD, Realtek) and install them.
3. Run Windows Update
After installing the driver, connect to the Internet and run Windows Update. This will ensure your system is updated with the latest security patches, improve performance, and add new features.
4. Install the necessary software
Finally, install the applications you use regularly, such as a web browser, office suite (Microsoft Office), antivirus software, etc.
Troubleshooting Common Issues When Installing Windows in UEFI Mode
During the Windows installation process, you may occasionally encounter some errors. Below are some common issues and how to resolve them:
1. The error “Windows could not complete the installation”
This error usually occurs after the computer restarts for the first time during installation. It may be caused by a missing driver, a configuration error, or a problem with the partition.
- Solution:
- When an error message appears, press Shift + F10 to open the Command Prompt window.
- Type "regedit" and press Enter to open the Registry Editor.
- Navigate to the following key: HKEY_LOCAL_MACHINE\SYSTEM\Setup\Status\ChildCompletion
- Find the value of "setup.exe" and change its value from 1 to 3.
- Close the Registry Editor and Command Prompt, then restart your computer. The system will skip the step causing the error and continue with the setup process.
2. The hard drive is not recognized
If the Windows or WinNT Setup program does not detect your hard drive, especially on new computers:
- Check the IRST driver: For Intel Gen 11+ processors with VMD enabled, make sure you have integrated the IRST driver into WinNT Setup or loaded the driver manually during installation.
- Check the VMD mode in the BIOS/UEFI: Access your computer's BIOS/UEFI settings and check whether Intel VMD mode is enabled. If it is, make sure you have loaded the IRST driver. Sometimes, disabling VMD (if not necessary) can help Windows recognize the hard drive without the IRST driver.
- Check the connection cables: Make sure the SATA or NVMe cables are securely connected.
3. Unable to boot into WinPE
If you cannot boot into the WinPE environment from a USB drive:
- Check the bitness of WinPE: Make sure your WinPE is the 64-bit version if you are trying to boot on a 64-bit UEFI system.
- Check the UEFI boot option: In the computer's boot menu, make sure you have selected the USB boot option in UEFI mode.
- Temporarily disable Secure Boot: Some systems may require you to disable Secure Boot in the BIOS/UEFI settings to boot from unofficial devices. Once the installation is complete, you can re-enable it.
- Check the USB drive: Make sure your USB drive is working properly and has been made bootable correctly.
4. Partition Error
Partition-related errors may prevent the installation process:
- Ensure the EFI partition: The EFI (ESP) partition must be formatted as FAT32 and labeled “EFI System Partition.”.
- Ensure the hard drive is GPT-formatted: The destination hard drive must be GPT-formatted to install Windows in UEFI mode.
- Check disk space: Make sure there is enough free space on the Windows installation partition (C:).
Alternatives to WinNT Setup for Installing Windows
Although WinNT Setup is a great tool, there are many other options for installing Windows, and each tool has its own advantages and disadvantages:
- Microsoft Media Creation Tool: This is Microsoft's official tool for creating a Windows installation USB drive or downloading a Windows ISO file. It is very simple and easy to use, but offers fewer customization options than WinNT Setup.
- Rufus: A popular tool for creating bootable USB drives from ISO files. Rufus supports both UEFI/GPT and Legacy/MBR, allowing you to customize certain installation options, such as bypassing the TPM requirement for Windows 11. You can learn more about how to create a Windows installation USB drive using Rufus in this comprehensive guide here.
- Ventoy: Allows you to create a versatile bootable USB drive. Simply copy the ISO files to the USB drive created with Ventoy, and it will automatically recognize them so you can boot directly from those ISO files without having to extract them or re-burn the USB drive every time you want to install a different version of Windows.
The choice of tool depends on your specific needs and skill level. WinNT Setup is particularly useful when you need a high degree of customization or are installing in a WinPE environment.
Frequently Asked Questions About Installing Windows Using the Standard UEFI WinNT Setup
What is WinNT Setup, and why should you use it to install Windows?
WinNT Setup is an unofficial Windows installation tool that allows you to install the operating system from ISO, WIM, or ESD files without having to burn them to a bootable USB drive or DVD. It is useful when you need to customize the installation process (add drivers, fine-tune settings), install on a computer without an optical drive, or work in a WinPE environment.
What is the difference between UEFI and Legacy BIOS, and between GPT and MBR?
UEFI is a modern firmware interface that supports fast booting, hard drives larger than 2TB, and Secure Boot, and comes with the GPT partitioning standard. Legacy BIOS is an older interface that limits hard drives to 2TB and uses the MBR partitioning standard. GPT supports more partitions and larger capacities than MBR. To install Windows in UEFI mode, the hard drive must be formatted using the GPT partitioning scheme.
What is the optimal size for the EFI (ESP) partition in Windows 10/11?
Microsoft recommends a minimum size of 100MB for the EFI System Partition (ESP) for Windows 10 and Windows 11. However, to ensure sufficient space for future system updates or additional boot components, many experts recommend setting the size to between 200MB and 300MB.
Why do Intel 11th Gen CPUs and later require an IRST driver when installing Windows?
Intel CPUs of the 11th generation and later use Volume Management Device (VMD) technology to directly manage NVMe drives. For Windows to recognize these NVMe drives during installation (especially from WinPE), the Intel Rapid Storage Technology (IRST) driver must be loaded. Without this driver, the Windows installer may not detect the drives.
Is it possible to install Windows XP/7 in UEFI mode using WinNT Setup?
Although WinNT Setup may support older versions of Windows, installing Windows XP or Windows 7 in UEFI mode on modern hardware is not recommended. Windows XP does not natively support UEFI, while Windows 7 supports 64-bit UEFI but not as fully as Windows 8 and later, often resulting in driver and compatibility issues. It is best to install Windows 8 or later on a UEFI system.