
In the modern computing world, BIOS (Basic Input/Output System) and UEFI (Unified Extensible Firmware Interface) are two firmware interfaces that serve as the foundation, managing the boot process and the interaction between the operating system and the hardware. Knowing how to access the BIOS/UEFI is an essential skill for every user, from reinstalling the operating system and troubleshooting to optimizing computer performance. This article will provide detailed instructions, common keyboard shortcuts, and troubleshooting solutions if you encounter difficulties accessing this critical configuration environment.
What Are BIOS and UEFI? Why Are They Important, and When Do You Need to Access Them?
Before delving into access methods, it is important to understand what BIOS and UEFI are, as well as their roles in computer operation. Both are low-level software programs stored on a special memory chip on the motherboard, responsible for initializing the hardware and handing control over to the operating system when the computer is turned on.
BIOS (Basic Input/Output System)
BIOS is a traditional firmware program that originated in the 1980s. It is the basic input/output system that performs the initial boot-up tasks (POST – Power-On Self-Test) to check hardware components such as the CPU, RAM, graphics card, hard drive, etc. After a successful check, the BIOS searches for and boots the operating system from the specified storage device.
Although it is now obsolete, the BIOS’s role in laying the groundwork for the operating system remains undeniable in the history of computer development.

UEFI (Unified Extensible Firmware Interface)
UEFI is a more modern firmware interface, developed by Intel in the late 1990s under the name EFI (Extensible Firmware Interface) to address the limitations of traditional BIOS. By 2005, its development and standardization were handed over to the UEFI Forum. Most computers manufactured after 2010 have switched to using UEFI instead of BIOS.
UEFI offers many significant improvements, including support for larger-capacity hard drives, a more user-friendly graphical interface, and enhanced security features. It serves a similar purpose to the BIOS but with more advanced technology, ensuring a faster and more secure boot process.
When do you need to access the BIOS/UEFI?
Users often need to access the BIOS/UEFI to perform the following important tasks:
- Changing the Boot Order: This is the most common reason, usually to reinstall the operating system from a USB drive or DVD, or to boot from a different drive.
- Enable/Disable Virtualization Technology: Features such as Intel VT-x or AMD-V are required to run virtual machines or emulators.
- Configure peripheral or integrated devices: Enable or disable network cards, audio, USB ports, or other devices on the motherboard.
- Setting a BIOS/UEFI Password: Enhance security by requiring a password to access firmware settings or even to boot the computer.
- CPU/RAM Overclocking: On high-end motherboards, users can adjust settings to boost hardware performance.
- Check basic hardware information or system temperature: View specifications for the CPU, RAM, and hard drive, or monitor the operating temperatures of the components.
- Troubleshooting startup issues: When your computer cannot boot into Windows, checking the settings in the BIOS/UEFI can help diagnose the problem.
BIOS vs. UEFI: The Key Differences
Although both serve to initialize the system, BIOS and UEFI represent two different generations of firmware technology with significant differences in capabilities and performance.
- History and Architecture:
- BIOS: First introduced in the 1980s, BIOS is an older form of firmware that operates in 16-bit mode and can access only 1 MB of memory during the boot process.
- UEFI: Developed in the late 1990s by Intel and standardized by the UEFI Forum since 2005, UEFI is a more modern firmware interface that supports both 32-bit and 64-bit modes, allowing access to more memory and enabling the execution of more complex tasks during the boot process.
- Hard drive and partition support:
- BIOS: Due to the limitations of the MBR (Master Boot Record) partitioning standard, it supports only hard drives with a maximum capacity of 2 TB and a maximum of 4 primary partitions.
- UEFI: It uses the GPT (GUID Partition Table) standard, which allows booting from hard drives larger than 2 TB (up to 9.4 ZB) and supports a virtually unlimited number of partitions. This is particularly important for today’s high-capacity hard drives. You can learn more about Partition an MBR/GPT hard drive to understand better.
- User Interface:
- BIOS: It has a text-based interface, usually blue or black, and can only be navigated using the keyboard.
- UEFI: They typically feature a more modern graphical user interface (GUI), support a mouse, and sometimes even include a touchscreen, making it easier for users to interact with them.
- Security features:
- BIOS: There are virtually no built-in security features during the boot process.
- UEFI: Incorporates advanced security features such as Secure Boot. Secure Boot is designed to prevent malware from loading during the boot process by allowing only boot software that is digitally signed by trusted providers. This is a mandatory requirement for Windows 11.
- Start-up speed: UEFI typically allows the system to boot significantly faster than traditional BIOS, thanks to its parallel processing capabilities and process optimization.
How can I tell if my computer is using BIOS or UEFI?
To check whether your computer is using traditional (Legacy) BIOS mode or UEFI, follow these steps in Windows:
- Press the Windows + R key combination to open the Run dialog box.
- Type "msinfo32" and press Enter to open the System Information window.
- In the System Information window, look for the line “BIOS Mode”.
- If displayed “Legacy”, your computer is using a traditional BIOS. If the following is displayed “UEFI”, your computer is using UEFI.
How to Enter BIOS/UEFI Using Keyboard Shortcuts on PCs and Laptops
The most common and quickest way to access the BIOS/UEFI is to use special shortcut keys as soon as the computer starts up. These keys usually need to be pressed repeatedly or held down for a few seconds immediately after you turn on the computer.
Common General Shortcuts
The following keyboard shortcuts are commonly used on many different computer models and motherboards:
- DEL (Delete)
- F2
- F10
- F12
- ESC


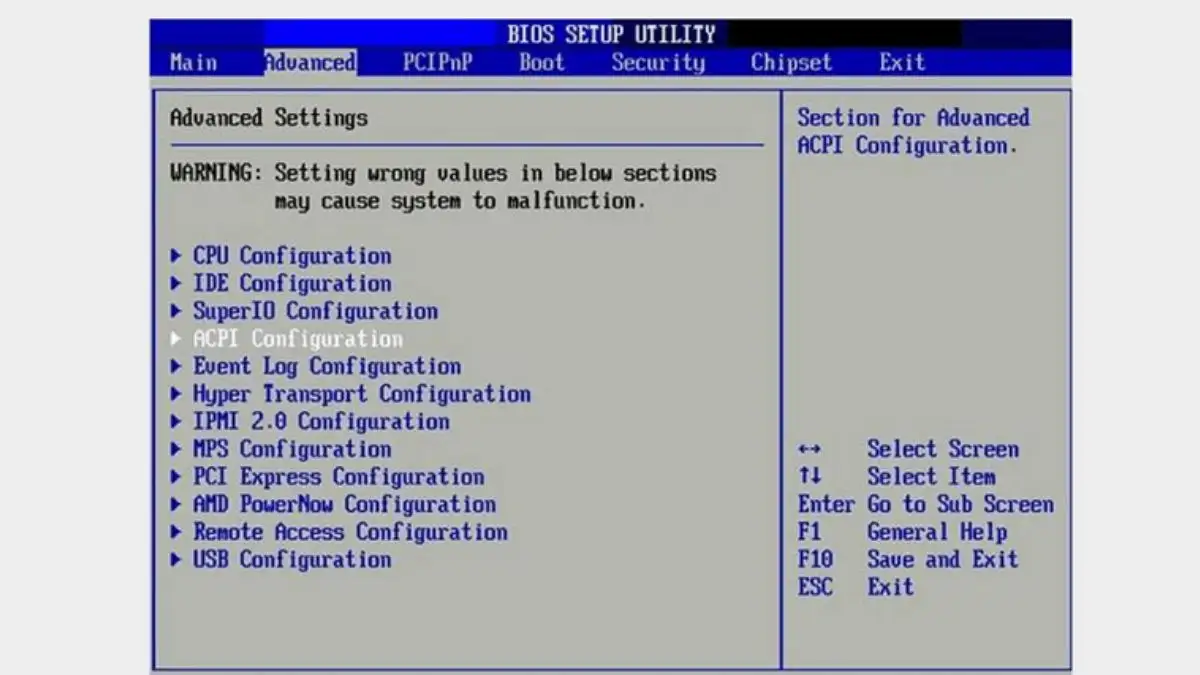

BIOS/UEFI Access Shortcut Keys by Motherboard Manufacturer
For desktop computers (PCs) that use different types of motherboards, the keyboard shortcuts may vary depending on the manufacturer:
- ASUS: DEL, F2, or F10
- Gigabyte: DEL
- MSI (Micro-Star): DEL
- ASRock: F2 or DEL
- Intel: F2
- Foxconn: DEL
- ECS Elitegroup: DEL or F1
- Acer: F2 or DEL
- HP (select models): F10 or ESC, then F10
- Dell (select models): F2
- Lenovo (select models): F1 or F2
- Biostar: DEL
- EVGA: DEL
- Fujitsu: F2 (or F12 to enter the Boot Menu, then select BIOS Setup)
- Supermicro: DEL
- ZOTAC: DEL
BIOS/UEFI Access Shortcut Keys by Laptop Model
Each laptop brand typically has one or more unique keyboard shortcuts. Below is a list of common keyboard shortcuts for various laptop brands:
- Acer: F2 or DEL. On some older models, it may be Ctrl + Alt + ESC or F1.
- Alienware: F2.
- ASUS: F2 (to enter the BIOS) or ESC (to enter the Boot Menu).
- Dell: F2.
- HP: F10, F2, or ESC (then press F10).
- Lenovo (ThinkPad): F1 or F2. Some models have a small Novo button (usually located next to the power button or on the side) to access the boot menu.
- Microsoft Surface: Hold down the Volume Up button and press the Power button.
- Razer: F1 or DEL.
- Samsung: F2.
- Sony Vaio: F2.
- Toshiba: F2 or F12.

Important Note: These keyboard shortcuts may vary depending on the specific model and year of manufacture of your computer. If the standard shortcuts do not work, refer to the device’s user manual or visit the manufacturer’s official support page.
Guide to Accessing UEFI Firmware Settings on Windows 10 and Windows 11
For modern Windows operating systems such as Windows 10 and Windows 11, accessing UEFI settings (commonly referred to as the BIOS in the user interface) can be done through the system’s advanced boot options. This method is particularly useful when traditional keyboard shortcuts don’t work or when you want to access UEFI settings more securely.
The Impact of the Fast Startup Feature in Windows
One important factor to note is the “Fast Startup” feature—also known as Hybrid Shutdown—in Windows 10 and Windows 11. This feature helps the computer boot up faster after shutting down by saving the kernel state to a hibernation file. However, this may prevent you from accessing the BIOS/UEFI using the traditional hotkey, as the system does not actually shut down completely but remains in a partial hibernation state.
To ensure you can access the BIOS/UEFI using a keyboard shortcut or through Advanced Startup Options, you should:
- Select “Restart” instead of “Shut down” when you want to enter the BIOS/UEFI.
- Alternatively, turn off the Fast Startup feature in Windows power settings:
- Open the Control Panel and select “Power Options.”.
- Select “Choose what the power buttons do.”.
- Click “Change settings that are currently unavailable.”.
- Uncheck the “Turn on fast startup (recommended)” box.
- Save changes.
Managing startup applications can also affect system performance. You can refer to the article Optimize Windows 10 and 11: Disable Startup Apps For more details.
Steps to Access UEFI Firmware Settings on Windows 10
Follow these steps to access UEFI settings in Windows 10:
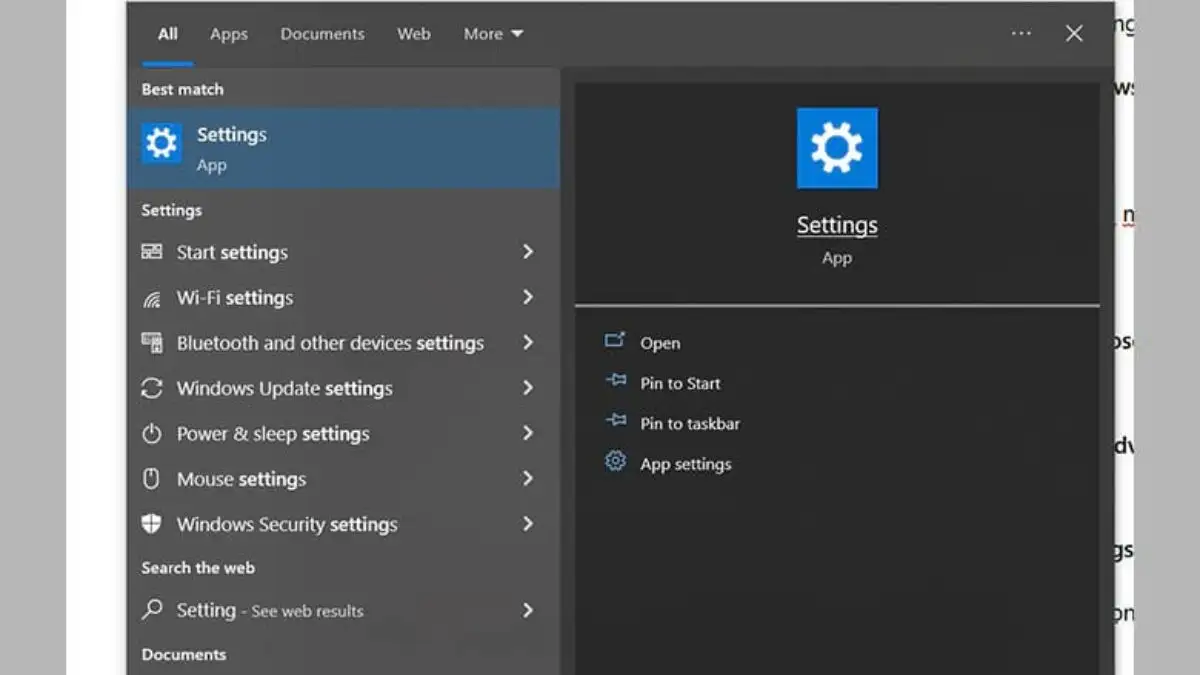
Step 1: Save all your current work and make sure to close all programs running on your computer. From the Start menu, click the Settings icon or press the Windows + I key combination.
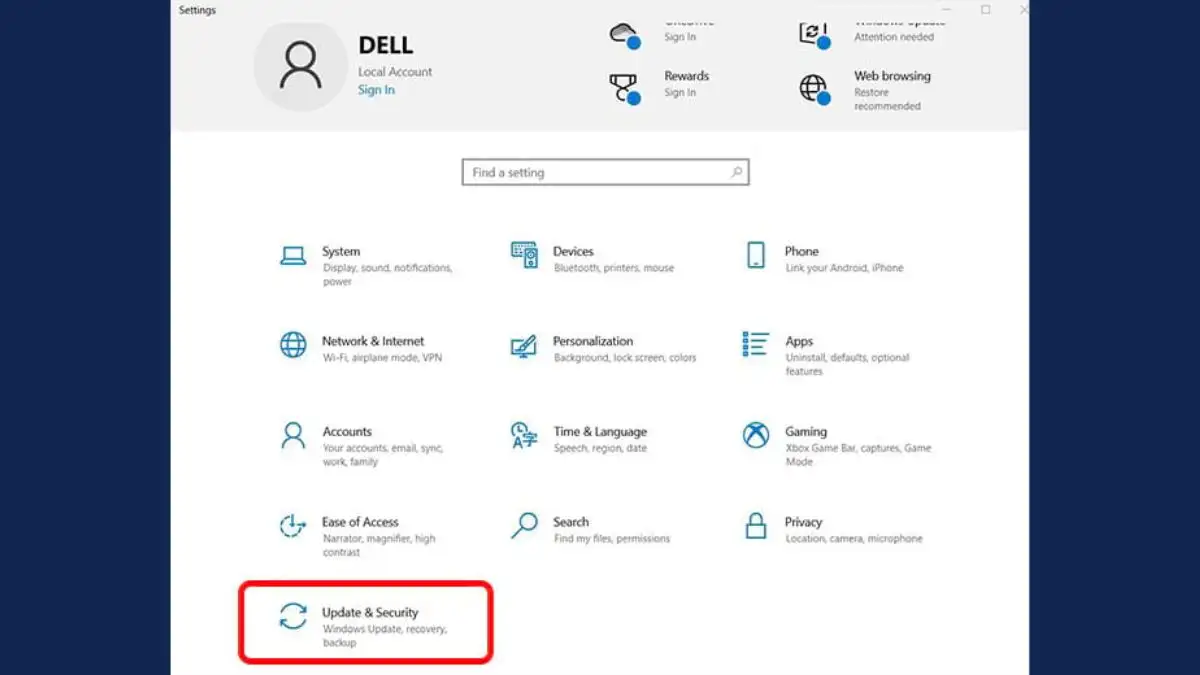
Step 2: In the Settings interface, select the Updates & Security.
Step 3: In Update & Security, select Recovery in the left pane of the screen.
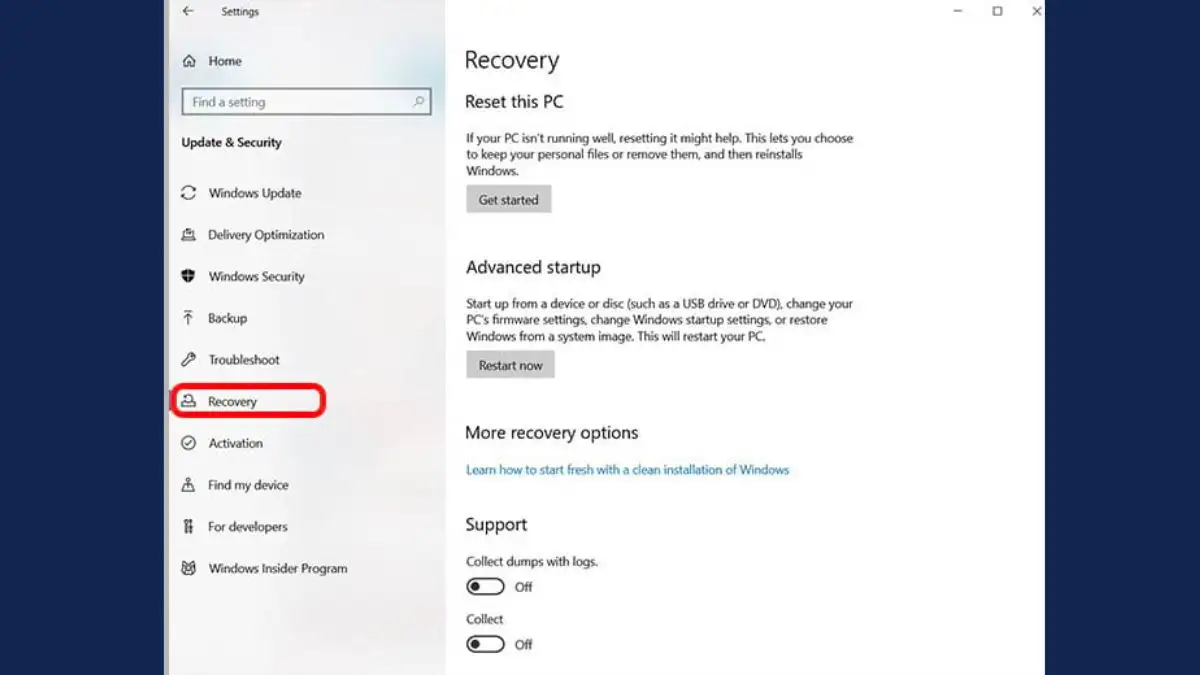
Step 4: In the "Advanced startup" section, select Restart now.

Step 5: After the computer restarts, the screen will display ‘Choose an option.’ Select Troubleshoot.
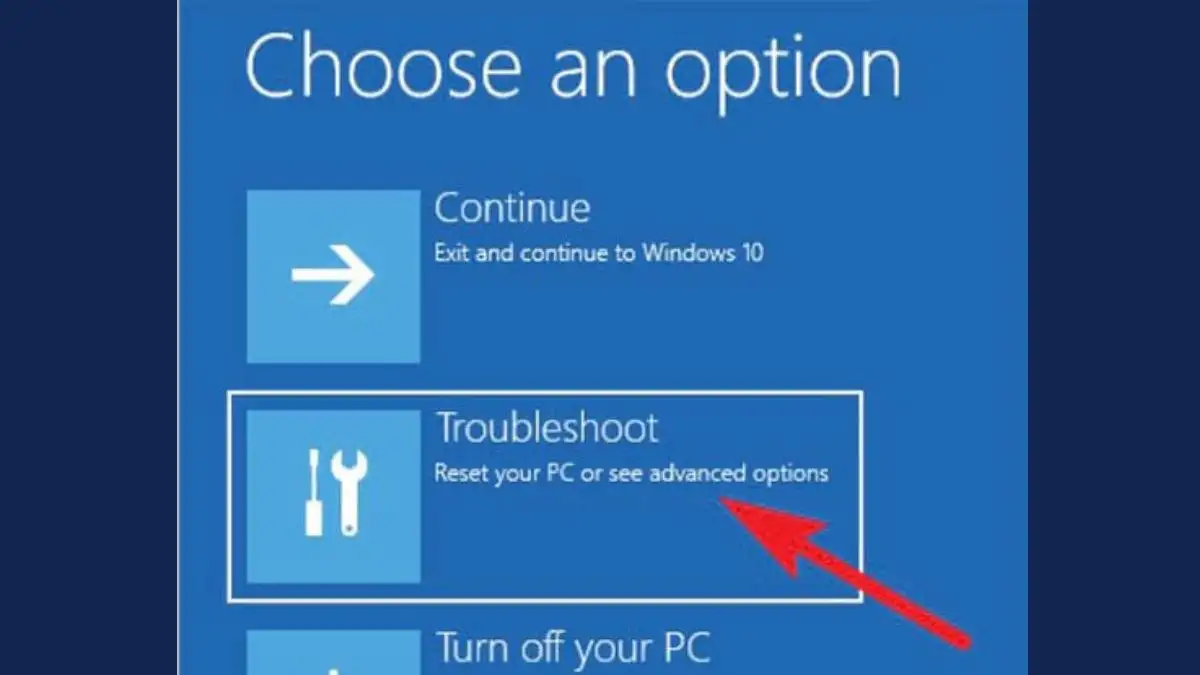
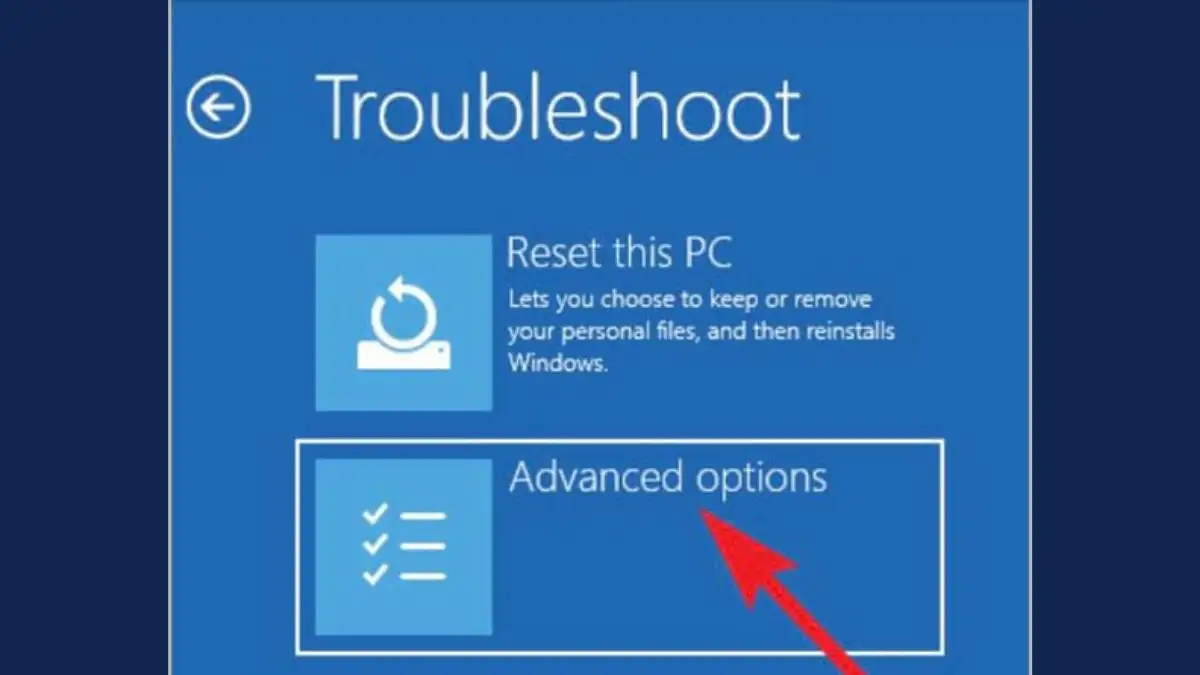
Step 6: In Troubleshoot, select Advanced options to access the Advanced Startup Options.
Step 7: When the Advanced Startup Options screen appears, select UEFI Firmware Settings.
Step 8: When the message ‘Restart to change UEFI Firmware Settings’ appears, select Restart to restart the computer. This will allow you to access the UEFI firmware settings.
After the computer restarts, you will be taken to the BIOS/UEFI interface. Here, you can make the necessary changes and settings.
How to Access UEFI Firmware Settings on Windows 11
Similar to Windows 10, Windows 11 users can access the UEFI Firmware Settings through the Advanced Startup Options. The steps are as follows:
Step 1: Open the app Settings by pressing the Windows + I key combination.
Step 2: Select the item System From the menu on the left, then select Recovery.
Step 3: In the “Recovery options” section, locate the item Advanced Startup and click the button Restart now.
Step 4: Windows will ask for confirmation; select Restart now once again.
Step 5: After the computer restarts into the advanced options menu, select Troubleshoot.
Step 6: Select Advanced options.
Step 7: Select UEFI Firmware Settings.
Step 8: Click on Restart to restart the computer and access the UEFI setup interface.

How to Enter the BIOS on Windows 7 (and Older Operating Systems)
For Windows 7 and older operating systems, the method for accessing the BIOS primarily involves pressing a traditional hotkey during the computer’s boot process. Advanced boot options through the operating system, such as those in Windows 10/11, are often unavailable or do not lead directly to the BIOS.
To enter the BIOS on Windows 7:
Step 1: Shut down the computer completely.
Step 2: Turn on the computer. As soon as the computer starts up (usually when you see the manufacturer's logo or a black screen with white text), please Press the BIOS/UEFI shortcut key repeatedly and quickly on your computer (for example: DEL, F2, F10, ESC). You need to press this key repeatedly until the BIOS screen appears.

Step 3: After making the necessary adjustments in the BIOS, you’ll typically press the F10 key to save the changes and exit the BIOS, after which the computer will restart.

Note regarding the “Print Screen” method in the source article: The methods of “pressing the Print Screen key to pause the reset process” and “selecting the BOOT menu and then selecting the Recovery option” mentioned in the source article do not appear to be direct ways to enter the BIOS; rather, they may involve accessing the manufacturer’s system recovery options (Recovery Environment) provided by the manufacturer. To enter the BIOS directly, pressing the shortcut key immediately upon startup is the standard and most effective method.
Troubleshooting: What to Do When You Can't Access the BIOS/UEFI?
Sometimes, accessing the BIOS/UEFI can be difficult. Here are some troubleshooting steps you can try:
- Double-check the shortcut keys and when to press them: Make sure you're using the correct keyboard shortcut for your computer model and press it as soon as the computer powers on, before the Windows logo appears. Try pressing it repeatedly and quickly instead of just once.
- Disable the Windows Fast Startup feature: As explained above, Fast Startup may prevent you from accessing the BIOS/UEFI using a keyboard shortcut. Turn off this feature in Windows power settings, or select “Restart” instead of “Shut down” when you want to enter the BIOS/UEFI.
- Try using a different keyboard: If you are using a wireless keyboard or a keyboard that is malfunctioning, try connecting a standard wired keyboard to a USB port to rule out the possibility of a keyboard-related issue. Sometimes, wireless keyboards may not initialize in time during the POST phase.
- Reset the BIOS/UEFI to its default settings: If you've changed the settings in the BIOS/UEFI and are experiencing issues, resetting them to their default values may help resolve the problem.
- In the BIOS/UEFI interface: Look for the option “Load Setup Defaults,” “Load Optimized Defaults,” or something similar. After selecting it, save the changes and exit.
- Remove the CMOS battery (for PCs): For desktop computers, you can shut down the computer, disconnect the power, open the case, and remove the small CMOS battery on the motherboard for about 5–10 minutes. This will clear all BIOS/UEFI settings and restore them to their defaults. Be careful when performing this procedure.
- Using the CMOS reset jumper: Some motherboards have a jumper (pin) for resetting the CMOS. Refer to your motherboard’s manual to find its location and learn how to use it.
- Update the BIOS/UEFI (only when necessary, and proceed with caution): A firmware update can resolve compatibility issues or improve performance. However, this is a high-risk process; if interrupted or performed incorrectly, it can permanently damage the motherboard (brick it). Therefore, you should only update when absolutely necessary, follow clear instructions from the manufacturer, and ensure a stable power supply.
- Check the keyboard/USB port connection: Make sure the keyboard is securely plugged into the USB port. Try plugging it into a different USB port.
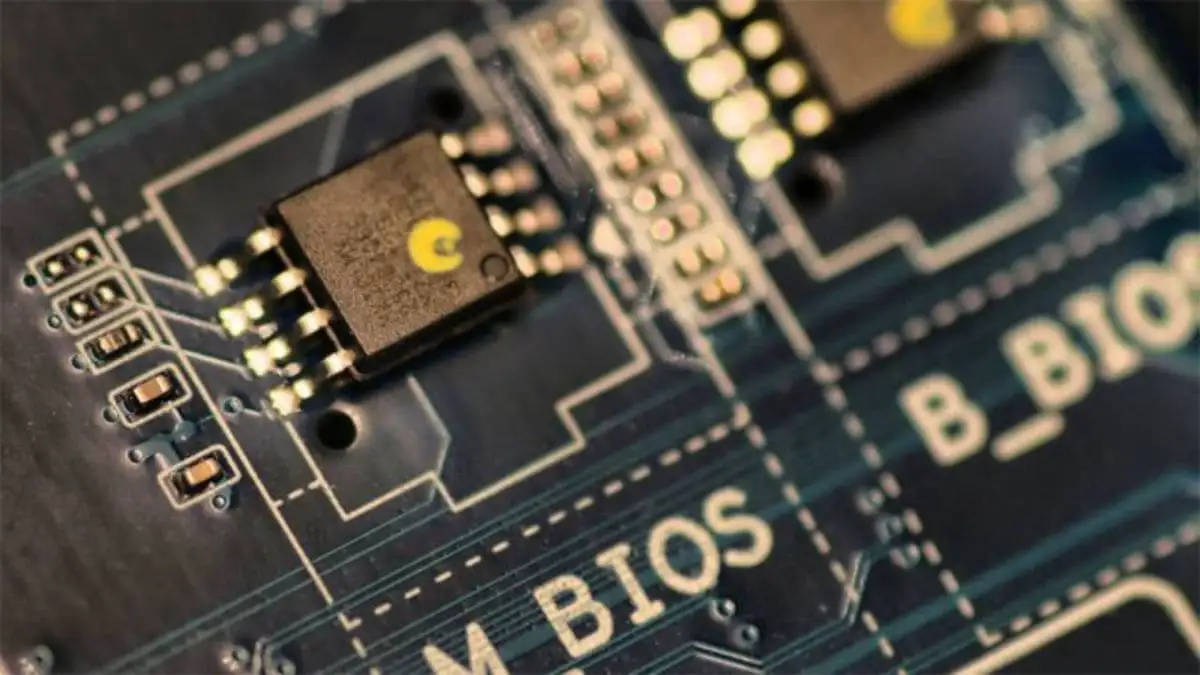
If, after trying all of the above steps, you are still unable to access the BIOS/UEFI, there may be a more serious hardware issue. In this case, contact the warranty center or a professional technician for assistance.
Important BIOS/UEFI Features You Should Know
Once you have successfully accessed the BIOS/UEFI, you will see a range of system configuration options. Below are some important features that users often need to adjust:
- Boot Order: These settings allow you to specify which device (hard drive, USB, DVD, network) the computer will attempt to boot the operating system from first. Changing the boot order is necessary when you want to install a new operating system from a USB drive or DVD, or boot into a repair environment. To create a Windows installation USB drive, you can refer to Guide to Creating a Windows Installation USB Drive Using Rufus or Install Windows 10/11 using the standard WinNT Setup for UEFI/GPT.
- Virtualization Technology: Features such as Intel VT-x or AMD-V allow you to run virtual machines efficiently on your computer. If you use virtualization software such as VMware or VirtualBox, you need to enable this feature in the BIOS/UEFI.
- Secure Boot: As a UEFI security feature, Secure Boot helps prevent malware from interfering with the boot process by allowing only software digitally signed by trusted providers to be loaded. Secure Boot is a mandatory requirement for installing and running Windows 11. You can learn more about Secure Boot in the context of hard drive partitioning.
- Setting a BIOS/UEFI Password: You can set a password to protect your BIOS/UEFI settings from unauthorized access. Some systems also allow you to set a boot password, which requires you to enter the password before the operating system begins to load.
- Hardware Monitoring: Most BIOS/UEFI interfaces include a section that displays information about CPU temperature, fan speed, voltage, and other system parameters, allowing you to monitor your computer's operating status.
- Peripheral/Integrated Device Configuration: Here, you can enable or disable USB ports, built-in network cards, sound cards, or storage controllers (for example, switch between AHCI and RAID modes for hard drives).
Understanding these features will help you manage and optimize your computer more effectively. However, always exercise caution when changing any settings in the BIOS/UEFI, as incorrect changes can cause system errors.
Conclusion
Mastering how to access the BIOS/UEFI is a basic yet extremely important skill for every computer user. Whether you need to change the boot order, enable virtualization, or troubleshoot issues, understanding the methods and shortcut keys will help you take control of your system. Always consult the manufacturer’s documentation and exercise caution when making changes in the BIOS/UEFI environment to ensure your computer operates stably and safely.
Frequently Asked Questions About Accessing the BIOS and UEFI
How can I tell if my computer is using BIOS or UEFI?
You can check this by pressing the Windows + R key combination, typing “msinfo32,” and pressing Enter. In the System Information window, look for the “BIOS Mode” line. If it says “Legacy,” your computer is using traditional BIOS. If it says “UEFI,” your computer is using UEFI.
Can I access the BIOS/UEFI if my keyboard is broken?
If the keyboard is completely broken, it is impossible to enter the BIOS/UEFI using a keyboard shortcut. In this case, you’ll need to replace it or borrow another keyboard (preferably a wired one) to gain access. For Windows 10/11, you can still try the Advanced Startup Options method if the operating system is still functioning, but you’ll still need a keyboard to navigate through that menu.
Is there any software tool that allows you to access the BIOS/UEFI without using a hotkey?
For modern computers running Windows 10 or Windows 11, you can access the UEFI settings through the operating system’s Advanced Startup Options, as described in the article. This is a software-based method that does not require pressing a hotkey immediately upon startup.
Is it safe to update the BIOS/UEFI?
Updating the BIOS/UEFI can offer benefits in terms of performance, compatibility, and security, but it is a high-risk process. If the process is interrupted (e.g., a power outage) or performed incorrectly, it can permanently damage the motherboard. Therefore, you should only update when absolutely necessary and always strictly follow the manufacturer’s instructions.
Why can't I access the BIOS/UEFI even though I pressed the correct shortcut key?
There are several possible reasons, including pressing the shortcut keys too slowly or at the wrong time, Windows“ ”Fast Startup” feature being enabled, a faulty keyboard or one that didn’t initialize in time (especially a wireless keyboard), or a hardware issue. Try turning off Fast Startup, using a wired keyboard, and making sure you press the key continuously as soon as the computer powers on.