In the context of ever-evolving technology, managing and protecting operating system data has become extremely important. “Ghost Windows” is a comprehensive backup method that allows you to quickly restore your system to a stable, working state in the event of a problem. In particular, for modern computers using the UEFI boot standard and the GPT disk format, this process requires a deep understanding to ensure effectiveness and prevent data loss. This article will provide a detailed guide on how to restore a Windows UEFI Ghost image using Acronis Cyber Protect Home Office, a leading system backup and recovery solution.
Introduction: What is Ghost Windows UEFI with Acronis Cyber Protect Home Office?
“Ghost Windows” is a common term in the information technology field, used to refer to the process of creating a backup (image) of the entire operating system, installed applications, personal settings, and user data into a single file. The main purpose is to quickly restore the system to its backed-up state in the event of issues such as virus attacks, system errors, or simply to deploy the operating system to multiple computers in a synchronized manner.
Acronis True Image, now known as Acronis Cyber Protect Home Office Since 2021, it has been a powerful data backup and recovery software that is widely trusted. In addition to its ability to create and restore system images, this new version also integrates advanced network security features such as real-time protection against ransomware and cryptojacking, providing comprehensive protection for your data.
The Difference Between UEFI/GPT and Legacy BIOS/MBR
To better understand how to boot a Windows UEFI ghost image, we need to understand the differences between the two main boot standards:
- Legacy BIOS (Basic Input/Output System) and MBR (Master Boot Record): This is an older standard that limits disk capacity to 2 TB and supports a maximum of 4 primary partitions. The boot process is slower, and it lacks modern security features. You can learn more about installing Windows using the Legacy BIOS/MBR standard at here.
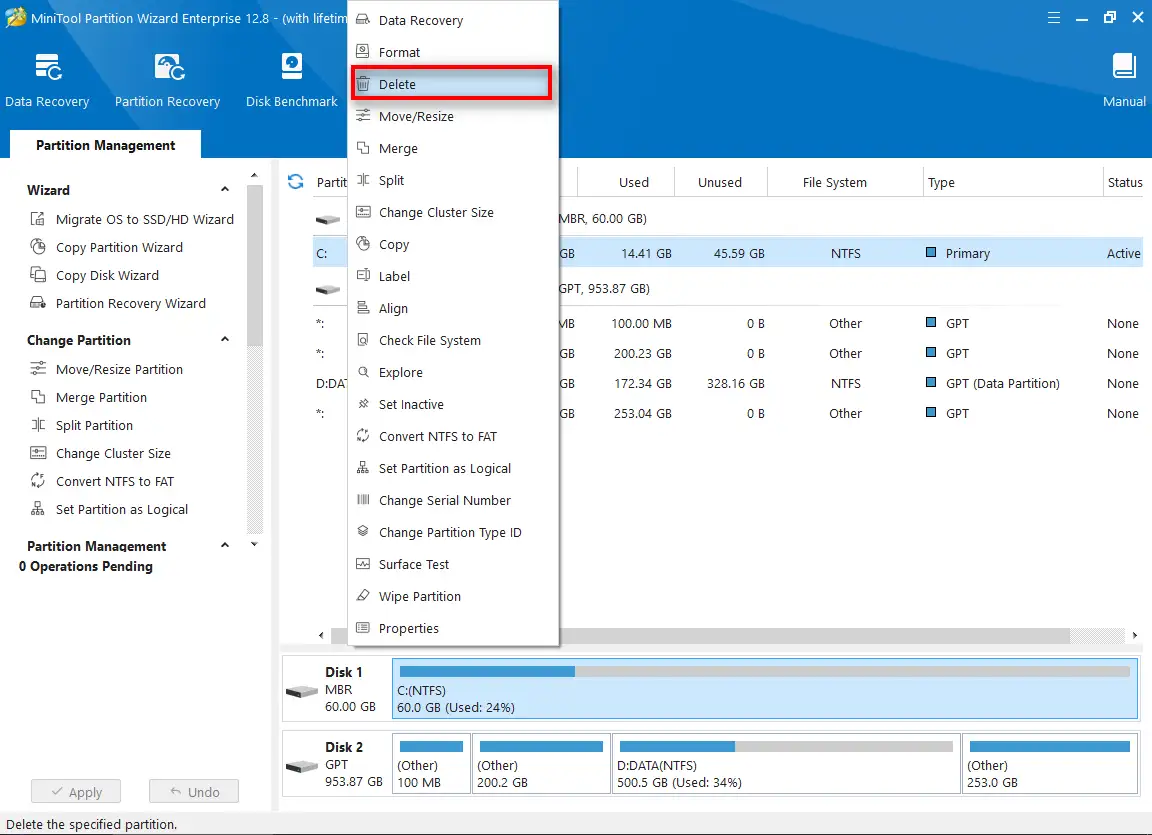
- UEFI (Unified Extensible Firmware Interface) and GPT (GUID Partition Table): UEFI is a modern firmware interface that completely replaces the traditional BIOS. It supports GPT drives, allowing for drive capacities larger than 2TB and the creation of a virtually unlimited number of partitions (typically 128 partitions on Windows). UEFI offers faster boot times, a more user-friendly graphical interface, and enhanced security features such as Secure Boot. GPT also improves data reliability by storing multiple copies of the partition table on the drive. To learn more about how to partition MBR/GPT hard drives, you can refer to this article.
Installing a Windows ghost image on a UEFI/GPT system requires a different process than on a Legacy/MBR system, primarily due to differences in partition structure and boot mechanisms. A UEFI Windows system typically requires at least three critical partitions to function properly:
- EFI System Partition (ESP): This partition contains the boot files required for UEFI, including the Windows Boot Manager.
- Microsoft Reserved Partition (MSR): A small partition used by Microsoft for internal operating system purposes.
- Windows Partition: The primary partition contains the Windows operating system, applications, and user data.
- In addition, there may be a Windows Recovery Partition.
During recovery, make sure all of these partitions are properly recreated and restored so that the system can boot normally.
Preparations Before Booting Ghost Windows UEFI
Thorough preparation is key to ensuring the Ghost restoration process goes smoothly. Here’s what you’ll need:
1. Windows Ghost files in .TIB format
A .TIB (True Image Backup) file is a proprietary backup image file format created by Acronis Cyber Protect Home Office software. This file contains all the data from a partition or drive, including the operating system, applications, settings, and user data. You’ll need a pre-existing .TIB file, typically created from a backup of a normally functioning Windows UEFI system.
2. USB Multiboot with WinPE and Acronis Cyber Protect Home Office pre-installed
You will need a bootable USB drive containing the WinPE (Windows Preinstallation Environment) and the Acronis Cyber Protect Home Office software. WinPE is a lightweight version of Windows that runs directly from RAM and is designed to install, deploy, and repair the Windows operating system without needing access to the main Windows system. A multiboot USB drive allows you to boot your computer from the USB drive to perform system recovery tasks even when the main Windows system cannot boot. To create a Windows installation USB drive, you can refer to Guide to Creating a USB Drive Using Rufus.
3. Check the boot mode (UEFI) and disk format (GPT)
Before you begin, make sure your computer is configured to boot in UEFI mode and that your hard drive is formatted as GPT. You can check this in your computer’s BIOS/UEFI settings. If the drive is in MBR mode, you’ll need to convert it to GPT before restoring the Windows UEFI Ghost image. Note that converting the disk format may result in data loss, so be sure to back up your data thoroughly.
4. Temporarily disable Secure Boot (if necessary)
Secure Boot is a UEFI security feature that helps prevent malware from loading during the boot process by allowing only drivers and boot loaders with valid digital signatures to run. Sometimes, when restoring a Windows UEFI Ghost image, if the Ghost image is incompatible or has signature issues, Secure Boot may prevent the system from booting. In this case, you may need to temporarily disable Secure Boot in the BIOS/UEFI settings to ensure the restoration process goes smoothly, then re-enable it once the process is complete.
5. Back up important data
Although the process of restoring a system image typically returns the system to its previous state, there is always a small risk of errors occurring. To ensure absolute safety, back up all important personal data on the destination drive to another storage device before you begin.
Steps to Restore a Windows Ghost Image in UEFI Mode with Acronis Cyber Protect Home Office
Once the preparatory steps are complete, we will proceed to restore the Windows UEFI image by following the detailed steps below:
Step 1: Boot the computer from the Multiboot USB drive into WinPE
Plug the Multiboot USB drive into your computer. Restart the computer and access the boot menu (usually by pressing F2, F10, F12, Del, or Esc, depending on the manufacturer). Select to boot from your USB drive. Once it has booted successfully, you will enter the WinPE environment.
Step 2: Open Acronis Cyber Protect Home Office from WinPE
In the WinPE environment, locate and launch Acronis Cyber Protect Home Office (or Acronis True Image if you are using an older version). The software interface will appear.
Step 3: Select the “Recover” function
On the Acronis main interface, select “Recover” or “My Disks” (as in older versions). Our goal is to restore a backup.
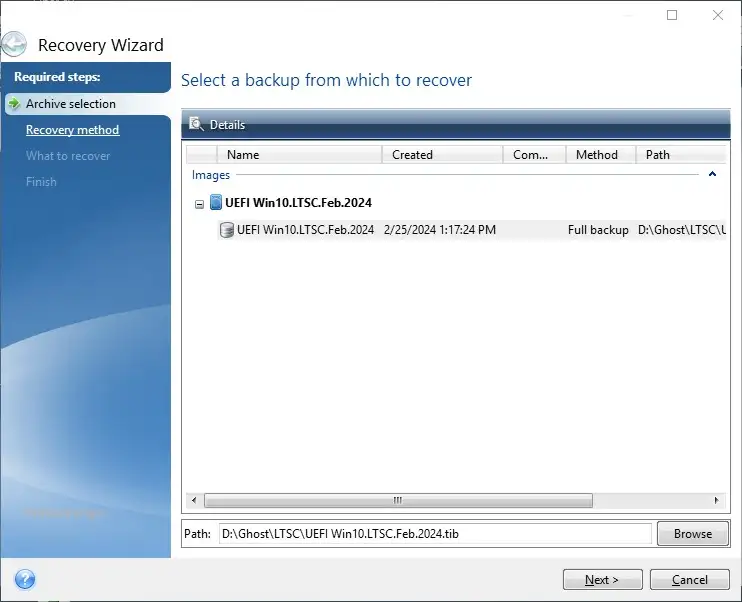
Step 4: Select the .TIB file you want to recover
Click the “Browse” button to navigate to the location where your .TIB file is stored. Select the desired .TIB file and click “Next” to continue.
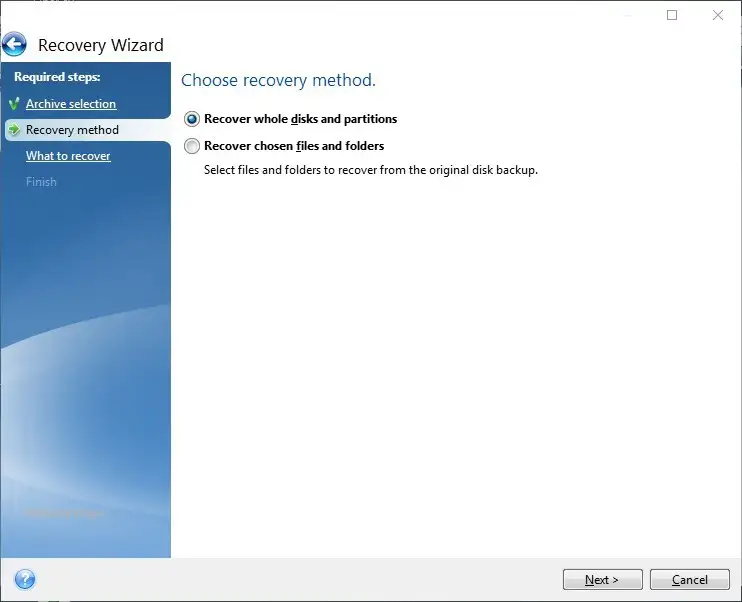
Step 5: Select a recovery method
Acronis will display the recovery options. Select “Recover disks or partitions” and click “Next.”.
Step 6: Select the destination drive/partition
This is an extremely important step, especially for UEFI/GPT systems. Acronis will display a list of the partitions contained in the .TIB file. You need to select the partitions you want to restore, including:
- EFI System Partition (ESP)
- Microsoft Reserved Partition (MSR) (if included in the Ghost image)
- The primary Windows partition
- Recovery Partition (if included in the Ghost image)
Important Warning: Under no circumstances should you select “Track 0” or select the entire physical disk (e.g., Disk 1, Disk 2…) when working with GPT disks.
In the GPT system, there is no “Track 0” in the traditional MBR sense. Instead, GPT uses a Protective MBR in the first sector for backward compatibility and to prevent older MBR tools from overwriting a GPT drive. Selecting the entire physical disk may result in overwriting the existing GPT structure, causing data loss on other partitions or corrupting the partition table. Select only the specific partitions (ESP, Windows partition, etc.) that you want to recover.
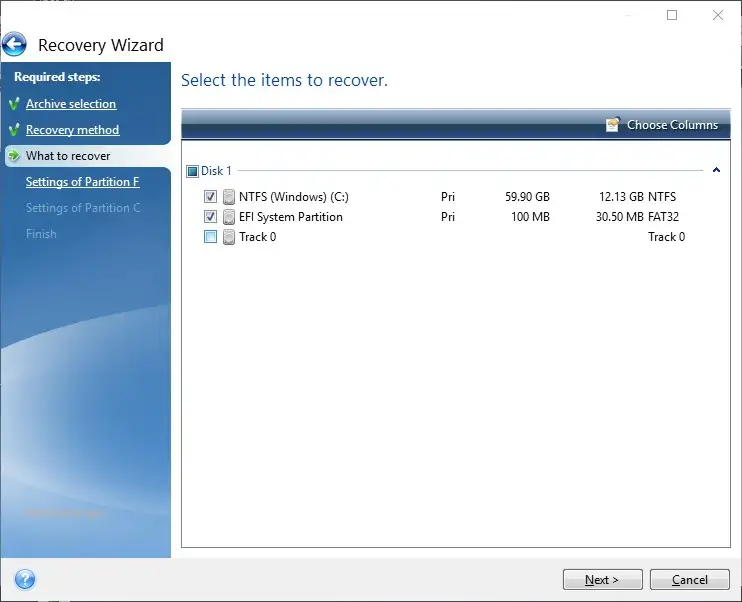
Step 7: Select a destination location for each partition
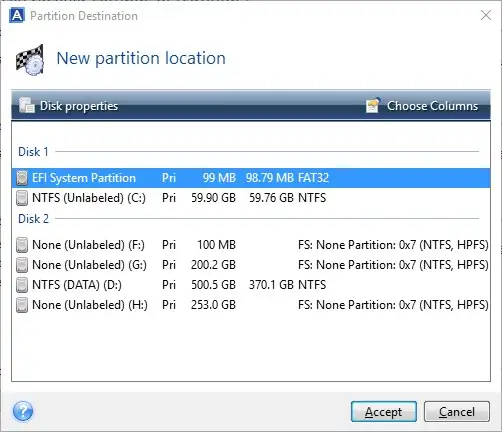
After selecting the partitions from the .TIB file, you need to specify a destination location on your physical drive for each of those partitions.
First, select the EFI System Partition (ESP) from the .TIB file, and then select the existing ESP partition on your destination drive (or an empty partition to create a new ESP).
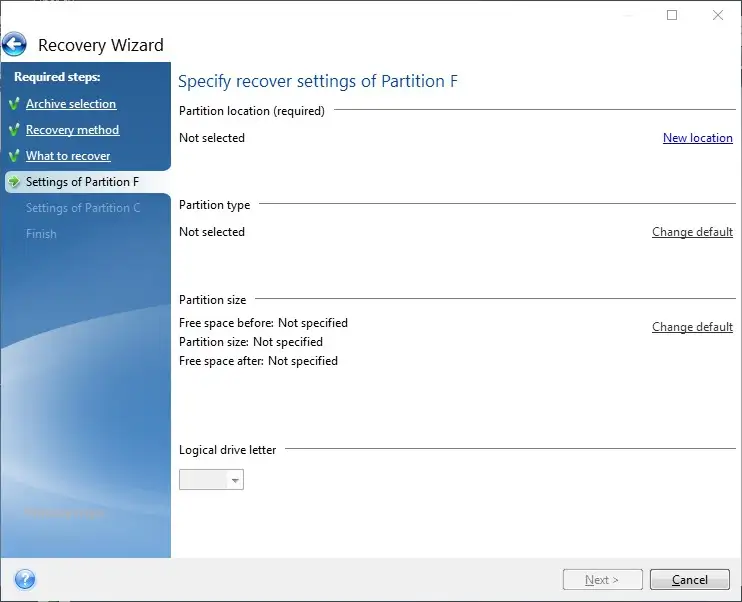
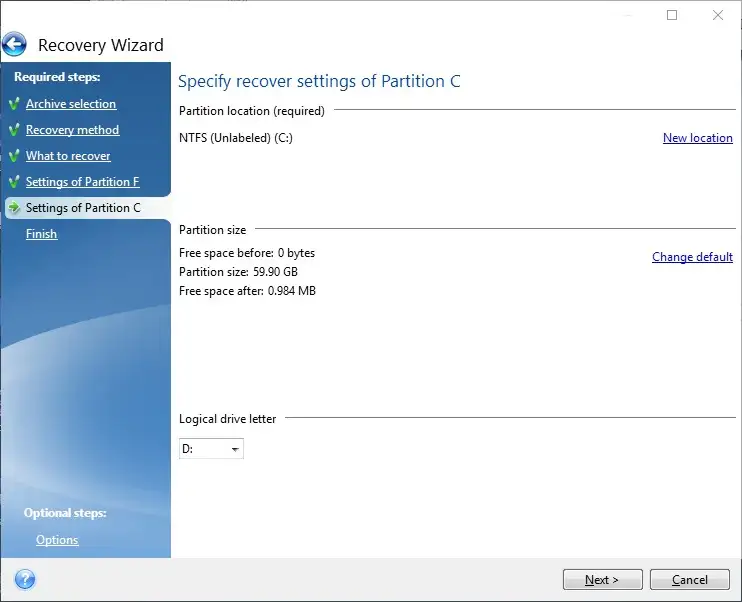
Next, do the same for the main Windows partition.
For the partition containing Windows, you can resize the partition. Make sure the destination partition has enough free space to accommodate the data recovered from the .TIB file. If the destination partition is smaller than the data in the .TIB file, the recovery process will fail. Conversely, if the destination partition is larger, the remaining space will become unallocated space or can be extended for future use. This helps optimize storage space and avoids the situation where “excess partition space” is not used efficiently.
Step 8: Confirm and start the recovery process
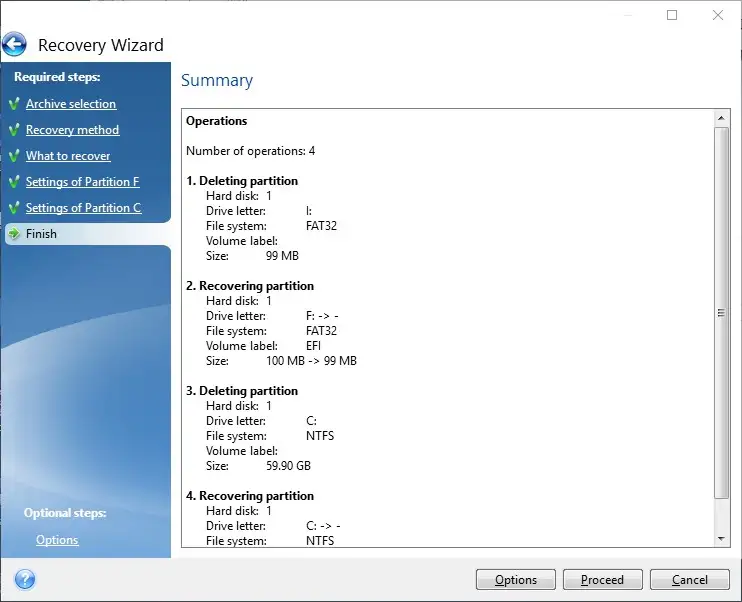
After you have configured all the destination partitions and their sizes, Acronis will display a summary of the changes. Check it carefully to ensure everything is correct. Click “Next” to continue, then click “Proceed” to start the recovery process. This process may take some time depending on the size of the Ghost image and the speed of your hard drive.
Step 9: Restart the computer and check
When the restoration process is complete, Acronis will notify you. Restart your computer and remove the Multiboot USB drive. The system will boot into the cloned version of Windows. If you previously disabled Secure Boot, go back into the BIOS/UEFI settings and re-enable Secure Boot to ensure the system’s security.
Important Notes and Troubleshooting Common Issues
Although the process of restoring a ghost image with Acronis Cyber Protect Home Office is fairly intuitive, there are still a few things to keep in mind and issues that may arise:
1. Regarding the warning “Do not check Track 0 under any circumstances”
As explained above, in a GPT environment, “Track 0” no longer contains the traditional MBR. This warning is essentially intended to remind users not to select the entire physical disk (e.g., Disk 1) but only specific partitions (ESP, Windows partition, etc.) during recovery. If you select the entire disk, Acronis may overwrite the Protective MBR or the GPT structure, resulting in a corrupted partition table and data loss on unintended partitions.
2. Resize the partition
When resizing the destination partition, always ensure there is enough free space to accommodate the data from the .TIB file. If you want the destination partition to be larger than the Ghost image, Acronis will automatically extend it or leave unallocated space. You can use disk management tools later to extend the partition or create a new partition from that free space. The purpose of “avoiding excess partition space” here is to optimize disk space usage, ensuring that partitions are allocated appropriately based on usage needs.
3. Common Errors and How to Fix Them
- Hard drive not recognized in WinPE: On some newer computers that use Intel VMD or RAID (IRST driver) technology, WinPE may not immediately recognize the hard drive. You will need to integrate the IRST driver into WinPE or disable Intel VMD in the BIOS/UEFI.
- Unable to boot after creating a Ghost image:
- Secure Boot Error: If you haven't disabled Secure Boot or the Ghost image is incompatible, the system may not boot. Try disabling Secure Boot in the BIOS/UEFI.
- EFI (ESP) Partition Error: The ESP partition may be corrupted or may not have been restored correctly. You can use the tools in WinPE (such as Diskpart and Bootrec) to check and repair the EFI boot partition. Make sure the ESP partition is formatted as FAT32 and contains the necessary boot files.
- Incorrect boot order: Check the boot order in the BIOS/UEFI to ensure that the Windows Boot Manager is set as the top priority.
- Corrupted .TIB file error: If the .TIB file becomes corrupted during creation or copying, the recovery process will fail. Make sure your .TIB file is intact and stored on a reliable drive.
4. The Importance of Secure Boot
After successfully restoring the system and confirming that it is running stably, be sure to re-enable Secure Boot in the BIOS/UEFI settings. Secure Boot is an important security measure that helps protect your computer from malware that might attempt to interfere with the boot process.
Frequently Asked Questions About Booting Ghost Windows UEFI with Acronis Cyber Protect Home Office
How do I create an initial Windows Ghost (.TIB) file?
To create a .TIB file, you need to install Acronis Cyber Protect Home Office on a Windows system that is functioning normally. Next, select the “Backup” function, choose the entire drive or system partitions (ESP, MSR, Windows Partition), and specify a storage location for the .TIB file. This process will create a comprehensive backup of your system.
Are special drivers required for WinPE (e.g., NVMe)?
Yes, sometimes WinPE may not recognize certain new hardware, such as NVMe drives or RAID controllers (Intel VMD). In this case, you’ll need to integrate the necessary drivers (such as the Intel Rapid Storage Technology—IRST driver) into your WinPE file when creating a multiboot USB drive. Some professional WinPE toolkits often come with many common drivers already pre-installed.
Is it possible to restore a system image from a network drive or an external drive?
Absolutely. Acronis Cyber Protect Home Office in a WinPE environment supports reading .TIB files from various sources, including external hard drives, USB drives, or even network drives (if your WinPE has the appropriate network drivers and is configured to access the network).
What is the difference between a ghost image and a clean Windows installation?
A clean install of Windows is the process of installing a completely new version of Windows, erasing all previous data and settings. Restoring from a Ghost image (.TIB file) is the process of returning the system to the exact state it was in when the Ghost image was created, including the operating system, all applications, drivers, and personal settings. Restoring from a Ghost image is much faster and more convenient when you want to restore a preconfigured work environment.
Conclusion
Deploying a Windows UEFI ghost image with Acronis Cyber Protect Home Office is a powerful and efficient solution for quickly restoring a system or deploying Windows. By following the preparation steps and detailed instructions—especially regarding the GPT partition structure and the “Track 0” warning—you can confidently perform this process safely and successfully. Regular backups and a solid understanding of recovery techniques will help you protect your data and maintain the stability of your computer system.