Partitioning a hard drive is an essential and important step when setting up a new computer or reinstalling the Windows operating system. The decision to choose between the MBR (Master Boot Record) or GPT (GUID Partition Table) partitioning standards, along with the corresponding boot mode—Legacy BIOS or UEFI—will directly impact the system’s performance, compatibility, and security features. This article provides a detailed guide—from the historical context to specific implementation steps—to help you confidently partition your hard drive in the most effective way possible to meet your needs.
To help you quickly grasp the main points, this article will delve into the differences between MBR and GPT, explain their relationship with Legacy BIOS and UEFI, and provide detailed step-by-step instructions using Partition Wizard software for both standards. You’ll also find helpful advice on when to choose which standard and how to troubleshoot common errors.
Understanding the Basics: MBR, GPT, Legacy BIOS, and UEFI
To partition a hard drive accurately and effectively, it is important to have a solid understanding of the basic concepts related to disk standards and boot modes. This understanding will help you make the right choices and avoid unwanted errors during the operating system installation process.
Traditional BIOS and the Emergence of UEFI
BIOS (Basic Input/Output System) is the first firmware used to boot IBM PC computers in the 1980s. It acts as an intermediary between the hardware and the operating system, performing initial tests (POST – Power-On Self-Test) and loading the boot loader from the disk to begin the operating system boot process. However, with the rapid development of hardware technology, the traditional BIOS began to reveal many limitations, particularly regarding its ability to support high-capacity drives and modern security features.
To address these limitations, Intel launched the EFI (Extensible Firmware Interface) project in the late 1990s, which was later developed into UEFI (Unified Extensible Firmware Interface) by a consortium of technology companies. UEFI is a modern alternative that offers significant improvements, such as a more user-friendly graphical interface, mouse support, faster boot times, and, most importantly, compatibility with drives larger than 2TB and enhanced security features.
MBR (Master Boot Record): Classic Partitioning Standard
MBR is a disk partitioning standard introduced with the IBM PC in 1983. It stores boot information and the partition table at the beginning of the disk. MBR works well with traditional BIOS systems and small-capacity disks.
Features and Limitations of the MBR:
- Capacity limit: MBR only supports drives with a maximum capacity of 2TB. If you have a drive larger than 2TB, the excess capacity will be unusable.
- Number of primary partitions: MBR allows a maximum of 4 primary partitions. To have more than 4 partitions, you need to create an extended partition and divide it into logical partitions. This can complicate partition management.
- Resilience: The MBR partition table is stored in only one location on the drive. If this table becomes corrupted, data recovery may be very difficult or impossible.
GPT (GUID Partition Table): A Modern Standard
GPT is a newer partitioning standard designed to address the limitations of MBR and is an integral part of the UEFI standard. GPT uses Globally Unique Identifiers (GUIDs) to identify partitions, providing significantly greater flexibility and robustness.
The outstanding advantages of GPT:
- Supports large file sizes: GPT does not have a 2TB limit like MBR. It supports drives with extremely large capacities, up to 9.4 ZB (zettabytes), making it suitable for today’s and tomorrow’s high-capacity hard drives.
- Number of partitions: By default, GPT allows you to create up to 128 primary partitions in Windows, eliminating the need for extended partitions and complex logical partitions.
- Data Recovery Capabilities: GPT stores copies of the partition table in various locations on the disk (typically at the beginning and end of the disk). If the primary partition table becomes corrupted, the system can use these copies to recover it, thereby enhancing data protection.
- Security Feature (Secure Boot): UEFI introduces the Secure Boot feature, a critical security mechanism that helps prevent malware from loading during the boot process. Secure Boot allows only drivers and boot loaders with valid digital signatures to be executed, ensuring that only trusted software can boot with the system.
The Close Relationship Between Disk Standards and Boot Modes
One extremely important point to note is the compatibility between the disk partitioning standard (MBR/GPT) and the system's boot mode (Legacy BIOS/UEFI). They must be compatible with each other:
- To install Windows in Legacy BIOS, the hard drive must be formatted according to the standard MBR.
- To install Windows in UEFI, the hard drive must be formatted according to the standard GPT.
A mismatch between the hard drive standard and the boot mode will result in errors during operating system installation or startup, typically in the form of error messages such as “Windows cannot be installed to this disk. The selected disk has an MBR partition table.” or “The selected disk is of the GPT partition style.”
Windows Compatibility with GPT/UEFI
Most modern versions of Windows support GPT/UEFI, but there are some specific conditions:
- All 64-bit versions of Windows starting with Windows Vista can be installed on a GPT drive when booting in UEFI mode.
- However, to boot Windows from a GPT drive, the system must have UEFI firmware.
- 32-bit versions of Windows cannot boot from a GPT drive; they can only be installed on an MBR drive.
When to Choose MBR and When to Choose GPT: Expert Advice
- You should use GPT/UEFI: This is the preferred option for most modern computers (manufactured after 2010), especially when installing a 64-bit version of Windows. It is required if the hard drive has a capacity greater than 2TB. It provides Secure Boot security and faster boot times.
- You should use MBR/Legacy: When installing older operating systems (e.g., Windows XP 32-bit) or on very old computers that only support Legacy BIOS. It can also be used if the hard drive is smaller than 2TB and you don’t need UEFI features.
Preparing Before Partitioning a Hard Drive: What You Need to Know
Before you begin partitioning your hard drive, you need to take a few preparatory steps to ensure the process goes smoothly and safely.
Determine the Current Hard Drive Partition Scheme (MBR or GPT)
If you are working with a used hard drive or are unsure of its current format, it is essential to check it. To check whether the hard drive is MBR or GPT, you can follow these steps in the Windows PE (Preinstallation Environment) or directly in a running Windows system:
- Open the Run dialog box by pressing the Windows + R key combination.
- Type "diskpart" and press Enter.
- In the Diskpart window, type the command "list disk" and press Enter.
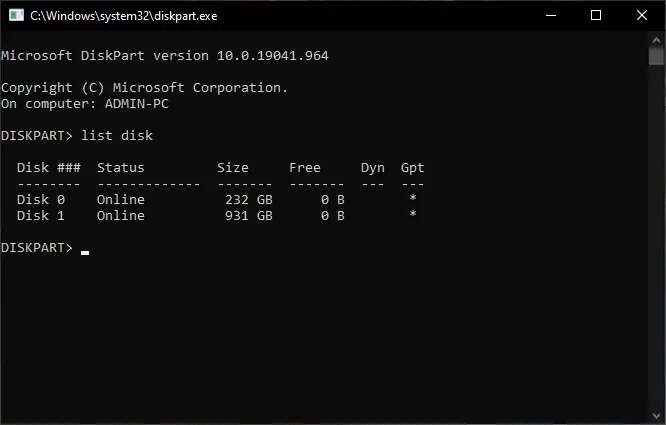
Note the column GPT. If the hard drive name in the column GPT with an asterisk * That means the hard drive is operating according to the standard GPT. If no asterisk * Then that's correct MBR.
Essential Tools: Bootable USB Drive and Partitioning Software
To partition a hard drive, you need a boot environment outside the main operating system (usually Win PE) and partition management software.
- USB Boot (Win PE): This is a USB drive containing a lightweight version of Windows that allows you to access system tools without installing the full version of Windows. To create a UEFI-compliant Windows installation USB drive, the most popular and reliable tool is Rufus. Rufus allows users to create a Windows installation USB drive from an ISO file, with specific options to select the partitioning standard (MBR or GPT) and boot mode (BIOS or UEFI).
- Partitioning software:
- Partition Wizard: It is a popular third-party tool that offers an intuitive graphical interface and many powerful features for managing partitions.
- Disk Management: A built-in Windows tool that allows you to create, delete, format, and resize basic partitions.
- Diskpart: A powerful command-line tool in Windows that provides more detailed control over partitions and drives. Suitable for experienced users.
- GParted: A free, open-source program that runs from a bootable USB drive, supports multiple file systems, and can perform complex partitioning tasks.
In this article, we will focus on using Partition Wizard because of its user-friendly and easy-to-use interface.
Guide to Partitioning a Hard Drive Using the MBR (Legacy BIOS) Standard with Partition Wizard
Partitioning a hard drive using the MBR standard is typically used for older systems or when you need to install 32-bit versions of Windows.
Steps for Using Partition Wizard
Suppose you have booted your computer from a USB boot drive and accessed the Win PE environment, then opened the Partition Wizard software.
- Select a drive and create a new partition:
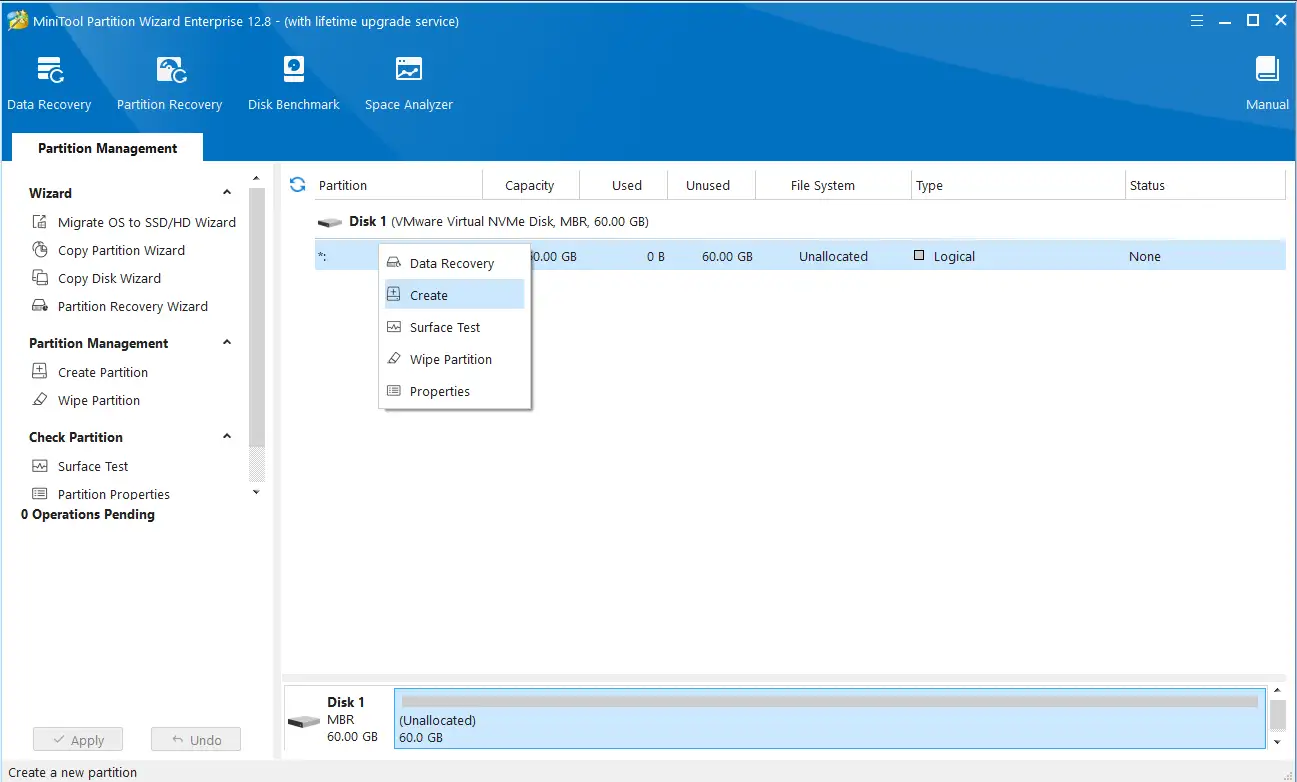
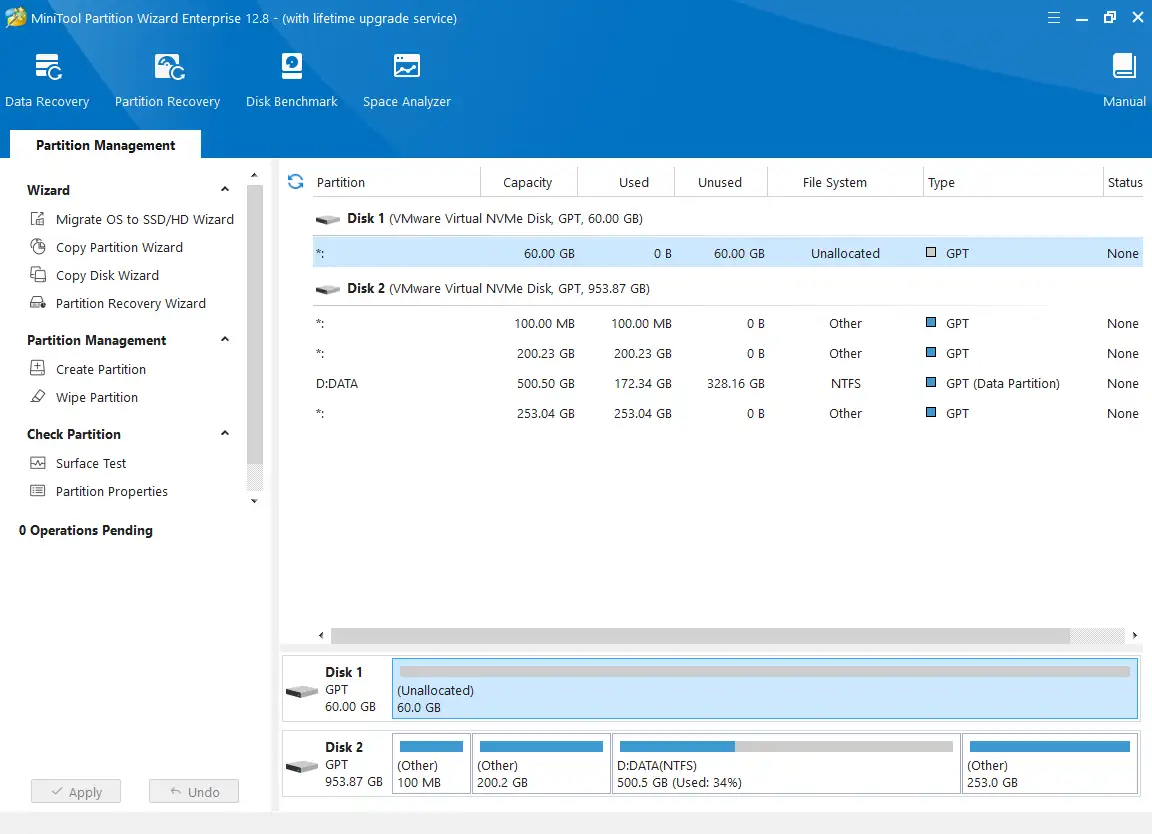
- As shown in the image below, you will see an unallocated disk with a specific capacity (for example, 60 GB).
- Right-click the “Unallocated” space on the drive you want to partition, then select Create to start creating a new partition.
- Set up partition information:
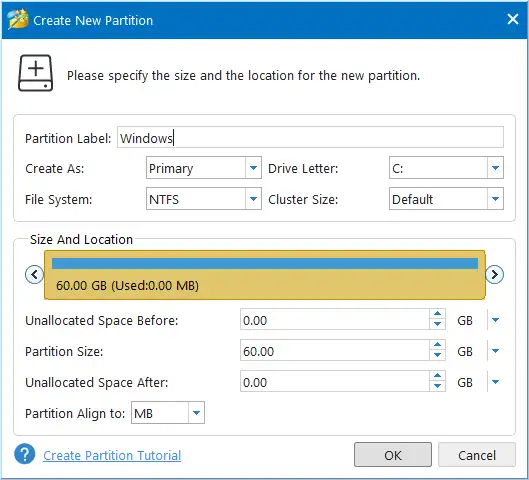
- Partition Label: Name the partition (for example, “Windows” or “OS”).
- Create As: Select Primary (primary partition). With MBR, you can create up to 4 primary partitions. The partition containing the operating system must be a primary partition.
- Drive Letter: Select a drive letter (for example, C:).
- File System: Select a format NTFS. This is the standard format for Windows partitions.
- Size and Location: Drag the slider or enter a specific number to adjust the partition size. For example, you can allocate 100–200 GB to the operating system partition.
- After setting it up, press OK.
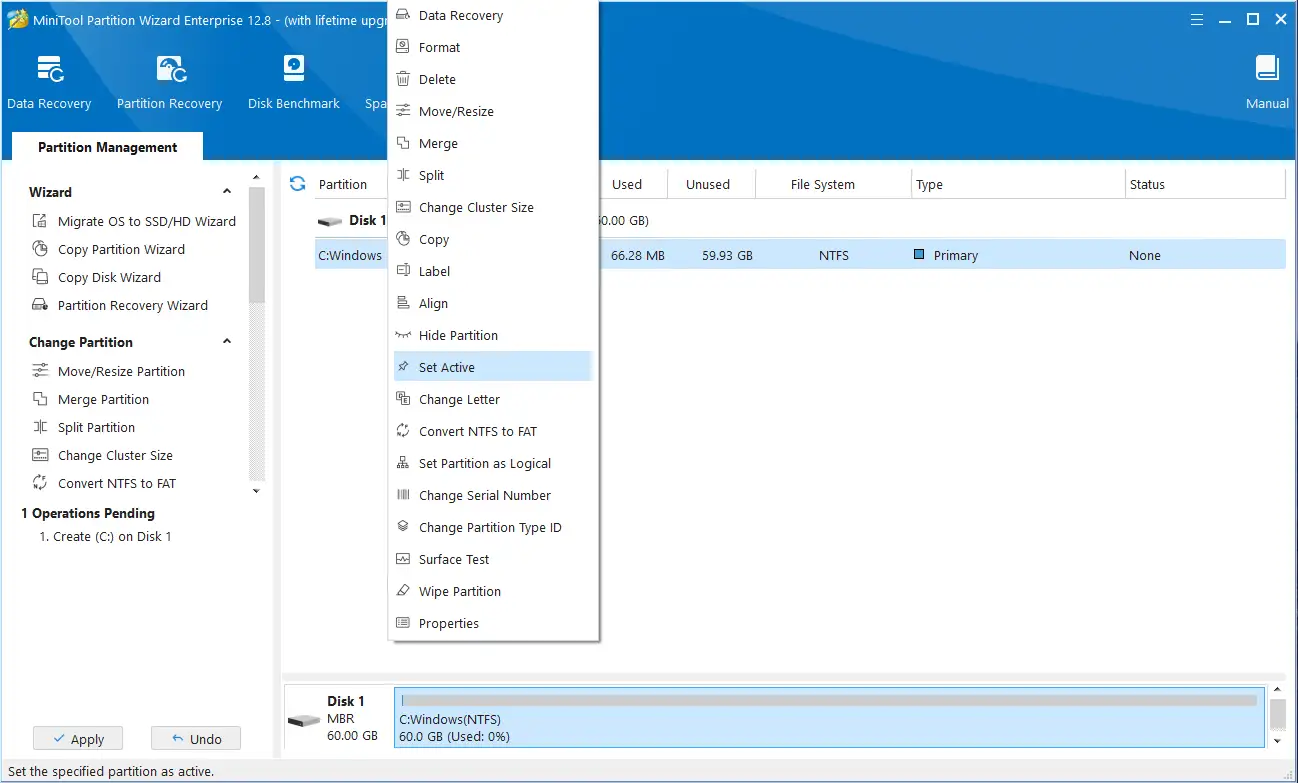
- Set the partition as Active:
- In MBR mode, the Windows installation partition must be marked as "Active" so that when the computer boots, the BIOS will recognize it as the boot partition containing the operating system loader.
- Right-click the partition you just created (the partition where Windows will be installed), then select Set Active.
- Create additional data partitions (optional):
- If you want to create additional partitions (for example, D:, E: for data storage), you can repeat steps 1 and 2 with the remaining space. For MBR, if you already have 4 primary partitions, you’ll need to create an extended partition first, and then create logical partitions within it.
- Apply the changes:
- After you have set up all the desired partitions, click the button Apply in the upper-left corner of Partition Wizard.
- A confirmation window will appear; select Yes to apply the changes. This process may take a few minutes, depending on the drive size and the number of partitions.
Guide to Partitioning a Hard Drive Using the GPT (UEFI) Standard with Partition Wizard
Partitioning a hard drive using the GPT standard is the best choice for modern computers that use UEFI, offering better performance and enhanced security features.
Steps for Using Partition Wizard
Similar to MBR, you need to boot your computer from a USB boot drive and open Partition Wizard. To install Windows in UEFI mode, you must ensure that your hard drive is formatted as GPT. If your hard drive is currently in MBR format, you can convert it to GPT using Partition Wizard (the “Convert MBR Disk to GPT Disk” feature) or using Diskpart (the `convert gpt` command after you’ve completely erased the data).
- Delete or resize an existing partition (if necessary):
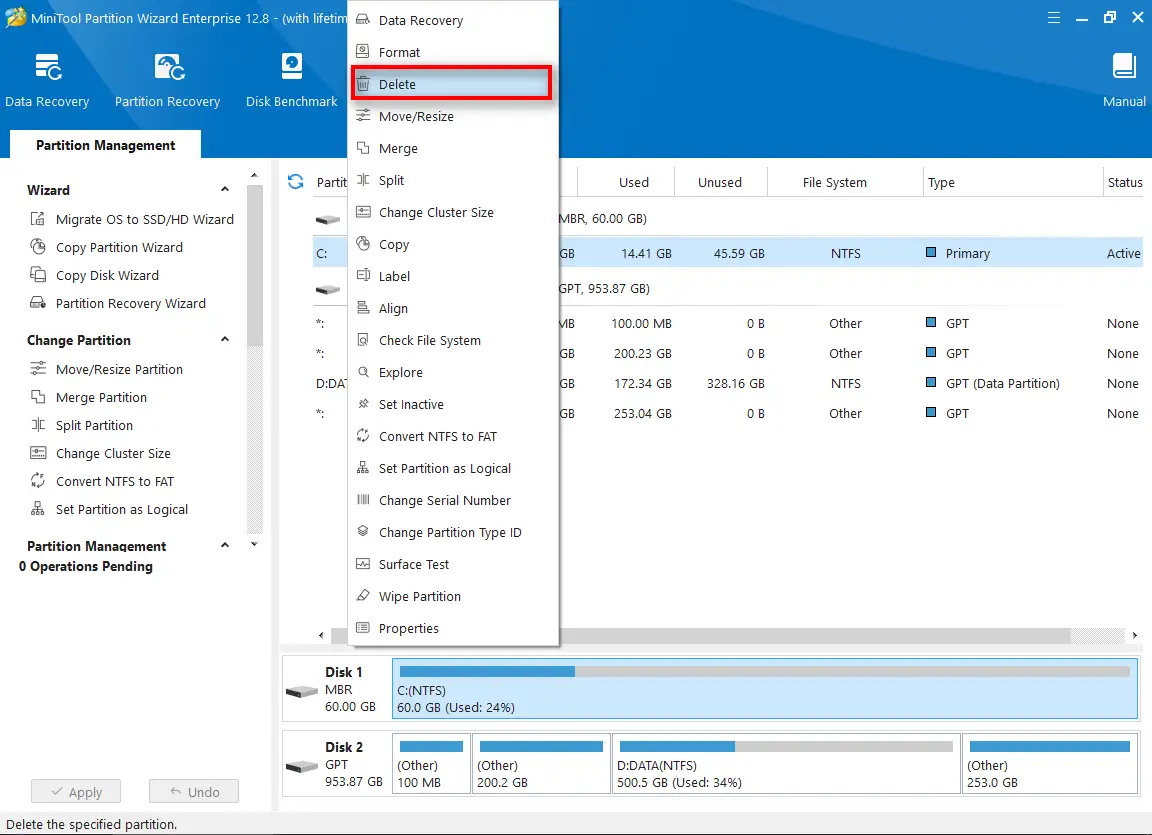
- If your drive already has existing partitions, you can delete them to create free space (Unallocated Space). Right-click each partition and select Delete.
- Create an EFI System Partition (ESP):
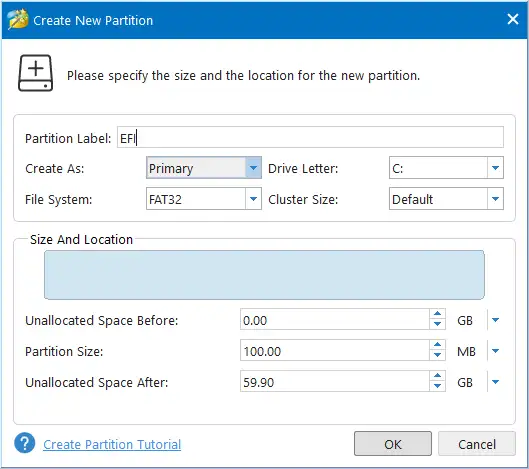
- The EFI System Partition (ESP) is a small partition, typically formatted as FAT32, that contains boot loaders, firmware applications, and data files necessary for the UEFI system to boot the operating system.
- Right-click the “Unallocated” area and select Create.
- Partition Label: You can leave it blank or name it “EFI.”.
- Create As: Select Primary.
- File System: Select FAT32.
- Size: The recommended size for the ESP is typically between 100 MB and 500 MB. Microsoft recommends 100 MB for drives formatted with 512-byte sectors and 260 MB for drives formatted with 4K sectors. Select the appropriate size (for example, 260 MB or 500 MB).
- Click OK.
- Change the Partition Type ID for the ESP:
- To ensure this partition is correctly identified as an ESP partition, right-click the FAT32 partition you just created, then select Change Partition Type ID.
- From the list, select EFI System Partition (ESP).
- Click OK.

- About the Microsoft Reserved Partition (MSR) and the Recovery Partition:
- When installing Windows on a GPT drive, Windows usually automatically creates a partition Microsoft Reserved Partition (MSR). This partition does not contain user data and does not have a drive letter; it is reserved for internal use by Windows (for example, converting a basic partition to a dynamic partition). The size of the MSR is typically 16 MB. You do not need to create this partition manually; Windows will create it automatically.
- Similarly, Windows also often automatically creates a partition Recovery (Windows Recovery Environment – WinRE) contains tools for troubleshooting system issues. This partition is typically between 500 MB and 1 GB in size. You also don't need to create it manually.
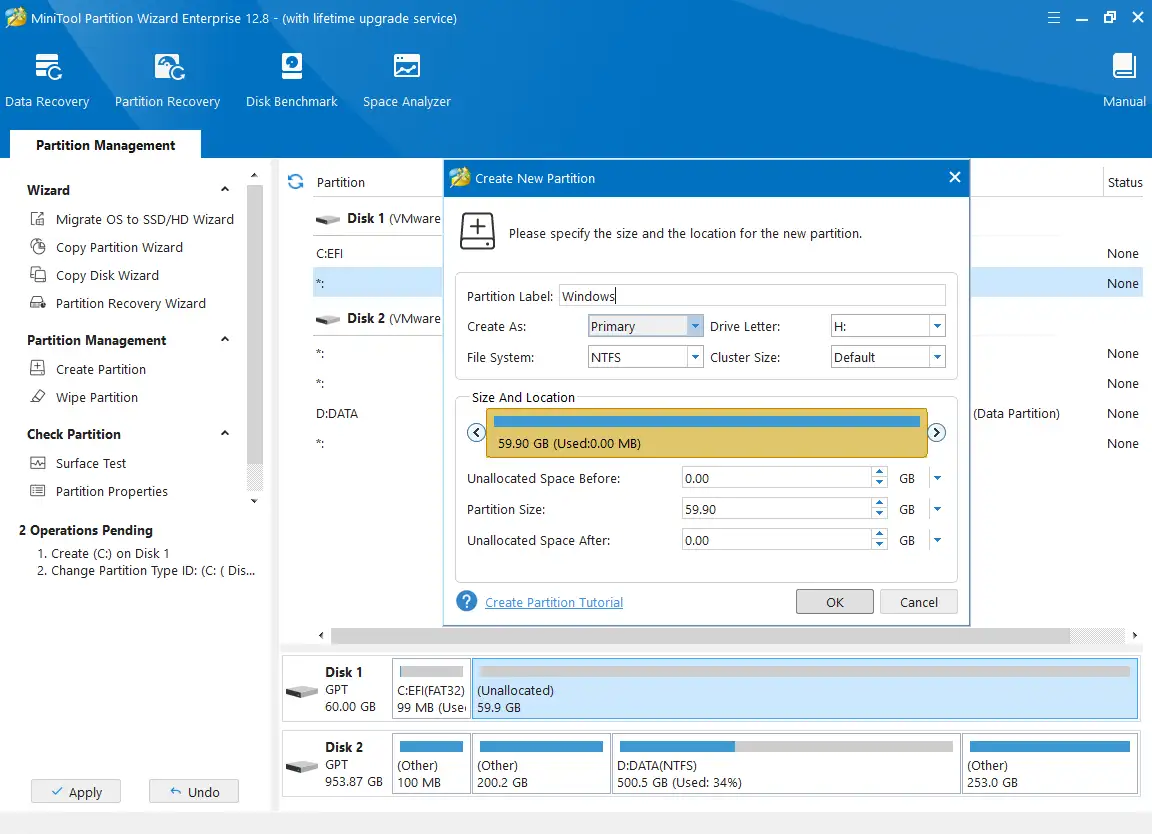
- Create a new Windows installation partition:
- Right-click on the remaining “Unallocated” space (or the free space after the ESP partition), and select Create.
- Partition Label: Name it “Windows” or “OS.”.
- Create As: Select Primary.
- Driver's License: Select a drive letter (for example, C:).
- File System: Select NTFS.
- Size: Allocate the desired amount of storage space to the operating system (for example, 100–200 GB).
- Click OK.
- Create additional data partitions (optional):
- Use the remaining “Unallocated” space to create other data partitions (e.g., D:, E:). Repeat the partition creation step, select Primary, format NTFS and give it an appropriate name.
- Apply the changes:
- After you have set up all the desired partitions, click the button Apply in the upper-left corner of Partition Wizard.
- Select Yes to confirm and apply the changes.
Important Tips for Safe and Effective Hard Drive Partitioning
- Data Backup: Always back up all important data before performing any partitioning operations, especially when converting between MBR and GPT or deleting partitions.
- Thorough inspection: Make sure you’ve selected the correct drive and partition settings before clicking “Apply.” Even a small mistake can result in data loss.
- Appropriate partition sizes: Carefully consider the sizes of the partitions. The operating system partition should have enough space for Windows, applications, and future updates. Data partitions should be allocated according to your needs.
- Partition order: Although Windows usually creates the MSR and Recovery Partition automatically, when partitioning manually, the recommended order is: ESP, MSR (if you create it manually—though Windows usually handles this on its own), the Windows partition, and finally the Recovery Partition (which Windows also usually creates automatically).
Properly partitioning a hard drive is the foundation for a stable and efficient system. By understanding the differences between MBR and GPT, as well as their relationship with Legacy BIOS and UEFI, you can confidently set up your computer according to the latest standards.
Frequently Asked Questions About Partitioning Hard Drives in Legacy and UEFI Modes
How do I convert a hard drive from MBR to GPT or vice versa without losing data?
Converting directly between MBR and GPT without data loss is a complex process that carries inherent risks. Tools such as Partition Wizard or AOMEI Partition Assistant can assist with this process. However, there is always a risk of data loss, so backing up all data is a mandatory step before proceeding. Otherwise, the safest approach is to back up the data, wipe the drive, then perform the conversion and restore the data.
What are some common mistakes when partitioning a hard drive or installing Windows with MBR/GPT, and how can they be fixed?
The most common error is incompatibility between the disk standard and the boot mode (for example, installing Windows UEFI on an MBR disk, or vice versa). This error typically displays the message “Windows cannot be installed to this disk. The selected disk has an MBR partition table.” or “The selected disk is of the GPT partition style.” To resolve this, ensure the disk is formatted correctly (MBR for Legacy, GPT for UEFI) before installation. You can use Diskpart to convert the disk format if necessary (note that this will erase all data).
Are there any risks associated with using third-party tools like Partition Wizard compared to Windows' built-in tools?
Third-party tools like Partition Wizard typically offer a user-friendly interface, many advanced features, and are easier to use than Windows’ Disk Management or Diskpart. However, the main risks are stability and compatibility. Some tools may not be fully compatible with all versions of Windows or certain hardware, which can lead to errors or data loss. Always use the latest software versions from reputable developers and back up your data before performing any operations.
What is the recommended size for the operating system partition (Windows)?
For the partition containing the Windows operating system, the minimum recommended size is 100GB to ensure sufficient space for the operating system, updates, applications, and some personal data. However, for the best experience and ample space for resource-intensive software or games, 150GB to 250GB is usually the ideal choice, especially with today’s SSDs.